This post originally appeared on designingsound.org
The Query Editor is a powerful tool within Wwise, yet most people I talk to either aren’t aware of it or never use it. With the Query editor, you can run searches in your project to easily make multi-edits, tag items, and even troubleshoot bugs. This post aims to lift the curtain on the Query editor to give users a better sense of how to wrap your head around this tool and become Wwise Power Users.
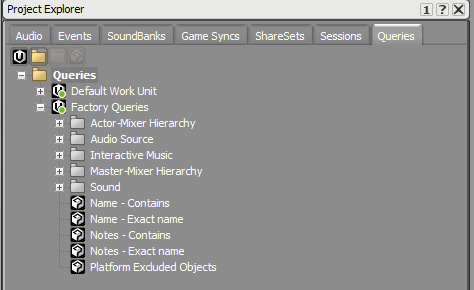
Queries have their own tab in the Project Explorer and like other tabs in a Wwise project this represents a folder in your Wwise project. You can add work units as needed and create or duplicate and modify the existing queries to drill into the system and find what you’re looking for. Think of a query as a kind of mini-report. If there’s something you’re trying to track down or you want to see all of the objects in your project that are set to a specific value or using a specific RTPC, you can use a query to generate a list showing these objects.
Understanding the Query Editor
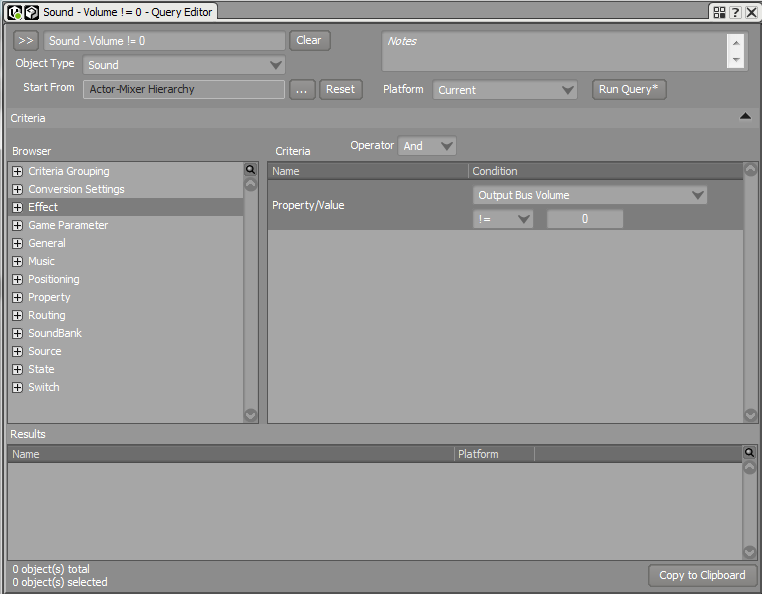
At the heart of the Query system is the Query editor. When we open a Query in Wwise, we are shown the Query Editor. We’ll break down the components of the Query Editor, but it is worth noting that it’s a fairly complex tool in regards to the number (and nesting) of settings you have access to, so it is highly recommended to spend some time with the interface to become familiar where some of the common settings live.
The top of the Query Editor shows us the name of the current Query and from here the information begins to flow down. The first thing we need to do is decide what type of Object we want the system to find. This can be any structure within Wwise from a Sound to a Random Container to a Music Segment and so on. Click the drop down in the Object type and scroll through to see all the options you have. Whatever you select here will be the object type that Wwise returns when you run your Query. If you want an inclusive search of all structures in your project, select All Objects.
Next you can choose where you want the search to start from. Clicking the ellipsis next to the “Start From” box will open up a window where you can select a place in the Actor Mixer Hierarchy or the Interactive Music Hierarchy or the entire project. Wherever you choose, the Query will perform a recursive search from. So if you choose the Actor Mixer Hierarchy it will search every structure in every work unit, whereas if you select a single work unit, it will only search through the contents of that work unit.
You can also select the Platform if you’re working on a multi-platform project so you can search for All platforms or just a single one if you need.
The browser window
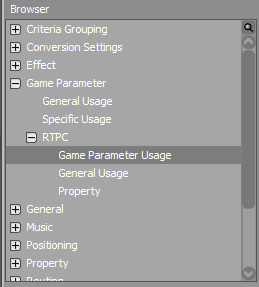
The browser section of the Query Editor is the meat of the system (or the protein-rich meat substitute if you’re vegetarian). The browser contains a series of collapsed categories and it is here that you can begin to select the logic and parameters you wish to search for. While this is the most powerful part of the Query editor, it is also unfortunately the most obtuse as well. It is often not super intuitive to find the parameter you’re looking for as it may be buried in a category you weren’t expecting, or given a generic name with a dropdown that will reveal the settings you’re after. Fortunately, if you’re on Wwise version 2015.1 or later you have the ability to search and filter within the browser by clicking on the tiny magnifying glass above the scroll bar. This will bring up a text field which you can type and the contents of the browser will filter its contents to what you’re typing. My advice is to actually spend a little bit of time looking through all of the categories in the browser, open up each one, click each option and see what lives in there. Having a cursory knowledge of these contents will help you create more powerful custom Queries later.
Criteria
When you select an item from the browser window, it displays in the Criteria window to the right of the browser. The Criteria window takes these generic categories and allows you to get a bit more specific with a variety of tools from simple drop downs and checkboxes to conditional statements. In the example above, I am looking for objects which use a specific RTPC. Also notice that the Criteria name shows you where in the browser that specific element is located (Game Parameter -> RTPC -> Game Parameter Usage). This is another area where the depth lends itself to a layer of complexity that is best understood by actually clicking through some of the options to see what is available to you.
Above the criteria window is an Operator dropdown. When you create multiple criteria for your Query, the operator allows to you say if you want all of them to be required to return objects in your search (And) or any of them to be allowed but not required (Or).
Results
Once you have all of these pieces laid out, you’re ready to let Wwise do the work. Click the Run Query button at the top of the editor, and if there are any objects that match the Object Type and Criteria in the scope of your search they will display in the Results window at the bottom of the Query Editor. From here you can select them and do a multi-edit or you can begin looking at individual objects to make adjustments or troubleshoot.
Essentially, what you’re doing with the combination of criteria and operator is creating a simple logic question for Wwise to answer. If you’re trying to find information about some sounds in your project, another way to approach it is to write it out a question and then build your query based on the criteria you’ve written out, such as “What sequence containers in my weapons actor mixer are set to continuous and use a trigger rate of less than 0.25 seconds?” To create a Query to return these objects, set your Object type to Sequence Container, set Start From to your weapons actor mixer and select Property values for continuous playback and Trigger rate (which you’ll set to < .25). Make sure the Operator is set to And and you’ve just answered your question!
Some examples
Even with the breakdown above, the Query Editor is a bit daunting. Fortunately, Wwise ships with an entire Factory Presets work unit full of very useful queries. Not only can we use these to find elements in our project, but we can also use them as a springboard to start making our own queries. Let’s take a look at a couple of these to see how the Query Editor works:
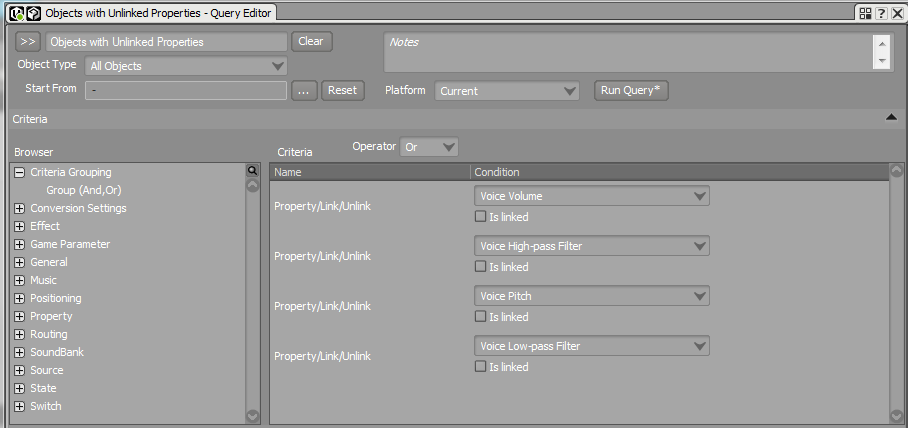
For those of you who have ever worked on multiple platforms where you needed to make platform-specific tweaks or changes to various objects, you know all too well the process of unlinking parameters from the “global” state of Wwise and having platform specific values. (For the uninitiated, you can break the connection of a slider and have Wwise apply different values for different platforms. So if you were working on a game where, for example the PC version had a different mix or number of variations than the Android version you do this via unlinking in Wwise). In projects like this, it’s common that some objects are unlinked but the majority remain linked. Perhaps you want to see all the objects in your project that are unlinked to get a sense of how different the platforms are. The image above is Audiokinetic’s preset for Objects with Unlinked Properties Query and it will do just that: show you all objects with unlinked properties. If we look at the Criteria in the Query Editor we can see that it’s basically looking for any objects (due to the OR operator) where the Volume, Pitch, Low Pass or High Pass filters are NOT linked. This Query will then return all objects in your project that have one of these objects unlinked. Drilling down through the Factory Queries is a great way to get comfortable with where various items live and what their tweakable parameters are. Lets look at another couple before making our own.
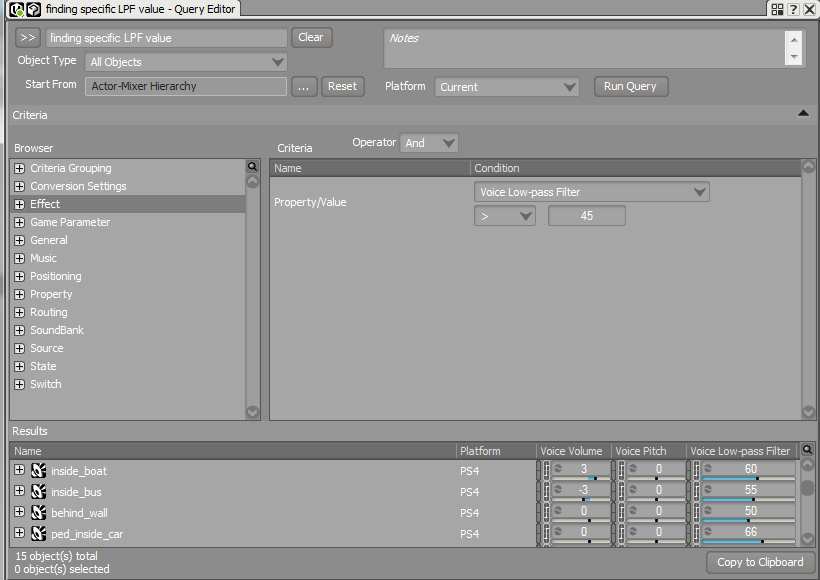
I’ve had bugs in my projects more often than I’d like to admit where my sounds are suddenly inaudible. Usually I’ll use the profiler to try and track down what is going on (which is fodder for a wholly separate article). The issue often lies with the additive nature of filters. I may have a low pass filter on a sound, and then a state or two may be active which also tweak the filter. The exponential nature of the filter means that while each of these modifications may be minor, they add up quickly to muddle the sound to the point of inaudibility. When troubleshooting what may be causing the excessive values, I’ll often look at the voices tab in the profiler and if I see a pattern in the LPF values or abnormally high values, I’ll then run a query looking for LPF values either at an explicit number or above a certain value. The image below shows a query of all objects with an LPF value greater than 45 as well as some objects it has returned. Note that you can change the conditionals in the criteria so you can look for values greater than, less than, equal to, etc., to pin down what you’re looking for.
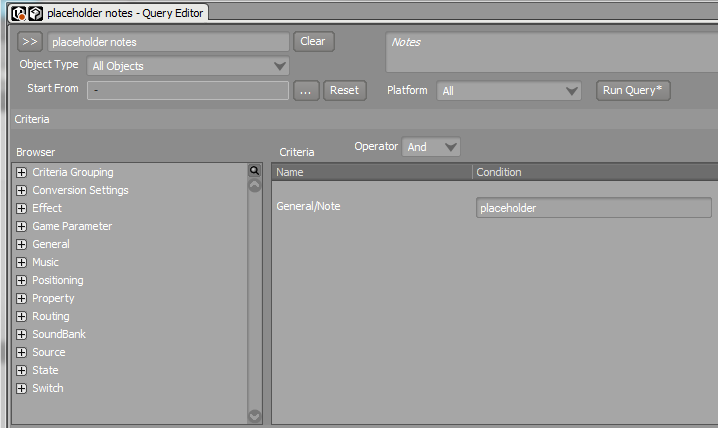
Now let’s say you use the Notes field in your project to help communicate with your Future Self about the state of things in the project. For example, when you add a placeholder sound, you add a note in the Notes field saying “placeholder.” With Queries, you can easily run a report to find all those sounds with a Note that reads “placeholder.” In the General section of the Browser is the item for Note. Type “placeholder” into the Criteria, run the Query on your project, and voila! All your placeholder sounds appear in the Results window. From here you can Copy them to the Clipboard to create a list for your reference, multi-edit them to remove the note, or modify them as you wish.
Putting it all together
So hopefully now we understand the basics of the Query Editor. Let’s create one for ourselves! When adding music to the Interactive Music Hierarchy, the Music Segments are not set to stream by default and doing so manually requires drilling down a few containers to get to the Music segments to tag them as streaming. It’s kind of a pain when importing multiple files at once. So let’s create a query to find all music segments not set to stream. Once we get these, we can easily multi-edit the list to make the ones we want stream.
First off, we need to create a new query. Like any structure in Wwise, this is as simple as creating a child Query within a work unit in the Queries tab like so:
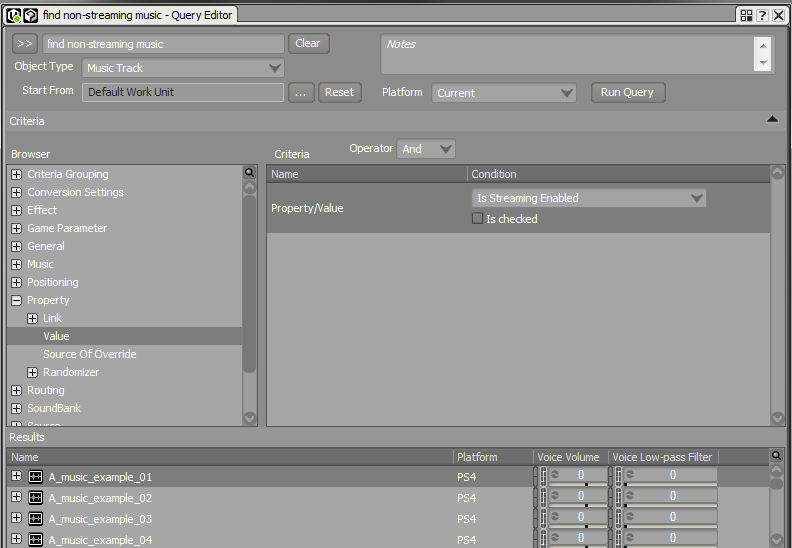
Next we’ll want to build our new query. I’m only concerned with Music Tracks in this instance since those are the music objects which contain the Streaming flag, so I’ll set the Object Type to Music Track. I select my Start From point as the Default Work Unit in my Interactive Music Hierarchy. In the browser, I open up Property and double click Value to add that item to the Criteria. I select “Is Streaming Enabled” from the drop down and keep the checkbox unchecked. Now this will find all Music Tracks in my Default Work Unit that are not set to stream. I click Run Query and a list of non-streaming music tracks will display in the Results window at the bottom of the Query Editor. I can now select those I want to stream and press Ctrl+M to bring up the multi-edit window and check the box to Enable Streaming. All done!
And that’s a cursory view of using the Query editor and how it can help you troubleshoot bugs and speed up workflow. It’s a very deep tool and one that definitely takes some playing around with to really grasp the breadth of its capabilities. If you are looking for information about content in your project, you can find what you need using Queries. The Factory Queries provided are a great jumping off point, followed by experimentation on your own and sharing/discussion with the community. What is shown here really only scratches the surface, and the level of complexity you can build with queries is really only limited by your imagination.

