I was interviewed a while back about methodologies for using reactive music in fighting games. I stumbled upon it the other day whilst trolling the internets. The author, Johnny Kilhefner, posed some interesting questions about how someone might go about designing a reactive music system. I rattled off some ideas and now it’s available for the world to see (and hopefully for someone to develop a music-based fighting game). Click here to open the article in another tab.
Blog
-
Creating seamless loops in Sound Forge
This is a simple trick I’ve used for years. It’s straightforward, but my designers and interns I’ve showed it to have appreciated it as a quick, easy, intuitive way to create seamless loops every time.
This method is useful mostly for static sounds at least a few seconds in length. It works great for ambiences, environmental effects like fire, wind, steam, water, or lasers, and even for sports sounds like skateboards, snowboards, and car engines at constant rpms.
Also, of course, this method will work in any audio editor or DAW. Sound Forge is just my wave editor of choice, and for me at least it’s the easiest way to quickly make seamless loops. So that’s where the screenshots hail from.
Step one: Design a longer than desired sound!
The first thing to do to make a seamless loop is to design a sound longer than you anticipate using. Basically what we’re going to be doing is hacking off the end of the sound and crossfading it into the beginning, so if you’re planning on having a 4 second looping sound, design a sound that’s between, say, 5 and 8m seconds long.

Step two: Find a zero crossing in the file where you want the end of the loop to be
Again, let’s say we want our sound to be roughly 4 seconds long, so go to the 4 second mark of the file and search for your nearest zero crossing.

Step three: Cut off the tail
Once you find the zero crossing nearest where you want your loop to end, select from that point all the way to the end of the file. Drag this section of the file (the tail) to the Sound Forge window to make a new file from it. Be sure to note how long the tail is.

Step four: Fade the tail
Select the entire tail file and do a -3dB exponential fade out.

Step five: Fade in the head of the loop file
Now, remembering the length of the tail file, select that much of the head of your looping file, and do a -3dB exponential fade in.

Step 6: Mix the tail into the head
Now select the tail file, and drag it to the beginning of your loop file. Make sure the file is set to loop, play it back and voila! A seamless loop.

Final thoughts
Bear in mind that, like any looping sound, what matters most is the design of the source file. If you have a bunch of aspects in a short looping sound that give it “character,” it more often than not will result in a sound that is very apparently looping. Furthermore if your loop contains rhythmic elements such as a skateboard clacking on a sidewalk or a laser oscillating and humming you need to ensure that your loop timing is set up to perfectly match the rhythmic timing of your sound.
-
Adventures in the Field, Volume 1: Skateboarding
Undoubtedly, one of the most enjoyable, fun aspects of being a sound designer is field and foley recording.
Perhaps one of the fondest memories of my career was when I was working for Konami in Hawaii. We were doing a PS2 game called Ys VI: The Ark of Naphishtim in which there was a cutscene with a huge pirate ship battle. There were a lot of cannonball blasts and splashes, so to get some good cannonball impact sounds, myself and the other sound designers, Jaren Tolman and Stillwind Borenstein headed over to the leeward side of the island where I proceeded to jump off a concrete pillar into the middle of the Pacific Ocean while Jaren held the Rycote blimp on a boom extended out over me and Stillwind ran the session on his laptop. We couldn’t believe we were getting paid to do this!
More recently I was working on a skateboarding game. Unfortunately, due to circumstances far beyond our control, it never saw the light of day. However it was another fun project that afforded me the opportunity to experiment with and record a variety of sounds in a realistic fashion that ended up sounding great in the game.
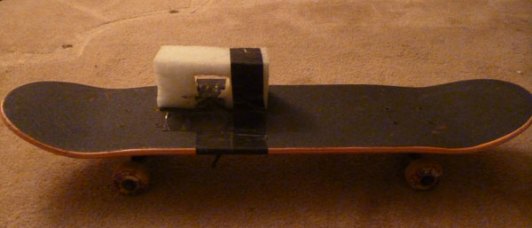
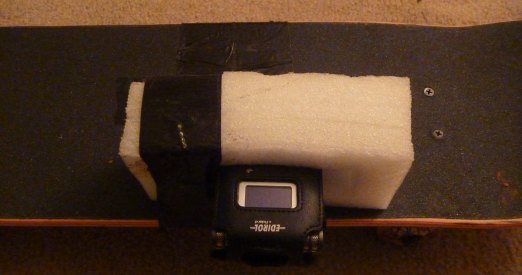
When we were first approached with the project, I instantly started thinking about how to get some good skateboarding sounds. Do I hire a pro and follow him around with a boom and a blimp? Is there a way I could somehow record all the necessary sounds myself? Being that this was a start-up, we had no budget for hiring anyone, nor did I have such necessary equipment at that time like a blimp or even a decent field recorder. So I opted to try some experiments with a DIY rig to see if I could make some quality sounds on the cheap. For recorders I had an Edirol R-09 and a Zoom H2. I opted for the Zoom because, while the preamps aren’t as good as the Edirol, it was also one-fourth the price, so if it got destroyed, which seemed likely, I wouldn’t be as pissed. To capture the sounds, I wanted to affix the recorder to the board, but needed a method that wouldn’t cause noise. I started with a piece of foam I found, that I believe came from a hard drive package. I cut out a hole to wedge the recorder into and duct taped it to the board. Ghettotastic!

And the results turned out really well! While I can’t show off the game for legal reasons, here’s what the audio content, all recorded in this method, sounded like:
Now, I’m no pro skater, so the only times I was actually riding the skateboard was to capture all the rolling sounds and a few of the ollies and landings. Most of the ollies, landings, power slides, bails, etc., were all recorded with the recorder firmly tucked into the foam and me “simulating” the movements as if it were a giant finger board. I would apply ample pressure so it sounded like there was some mass on the board and eq things when designing the actual sounds. But every skateboarding sound you hear was captured with the skateboard above and that magic piece of foam.

-
Welcome!
Hi there! You found me! So this is yet another blog, by yet another sound designer, who plans to share wisdom, knowledge, and less useful tidbits to all who care to listen, watch, and read. I’ve got a few entries planned here on various subjects from crafting seamless loops to extreme sports recording to doing cool shit in Wwise. Thanks for your interest. Check back soon (or, gulp, follow me on twitter) to find out what’s new.
brad