Author: Rev. Dr. Brad

  • Tutorial: Using Queries in Wwise

    This post originally appeared on designingsound.org


    Wwise_Queries_banner

    The Query Editor is a powerful tool within Wwise, yet most people I talk to either aren’t aware of it or never use it. With the Query editor, you can run searches in your project to easily make multi-edits, tag items, and even troubleshoot bugs. This post aims to lift the curtain on the Query editor to give users a better sense of how to wrap your head around this tool and become Wwise Power Users.

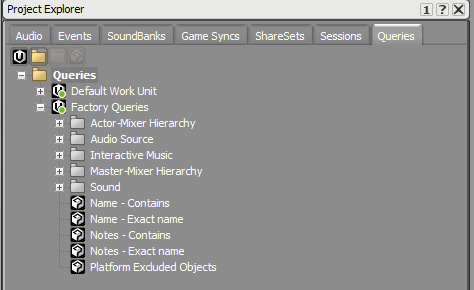
    Project Explorer

    Queries have their own tab in the Project Explorer and like other tabs in a Wwise project this represents a folder in your Wwise project. You can add work units as needed and create or duplicate and modify the existing queries to drill into the system and find what you’re looking for. Think of a query as a kind of mini-report. If there’s something you’re trying to track down or you want to see all of the objects in your project that are set to a specific value or using a specific RTPC, you can use a query to generate a list showing these objects.

    Understanding the Query Editor

    Query Editor

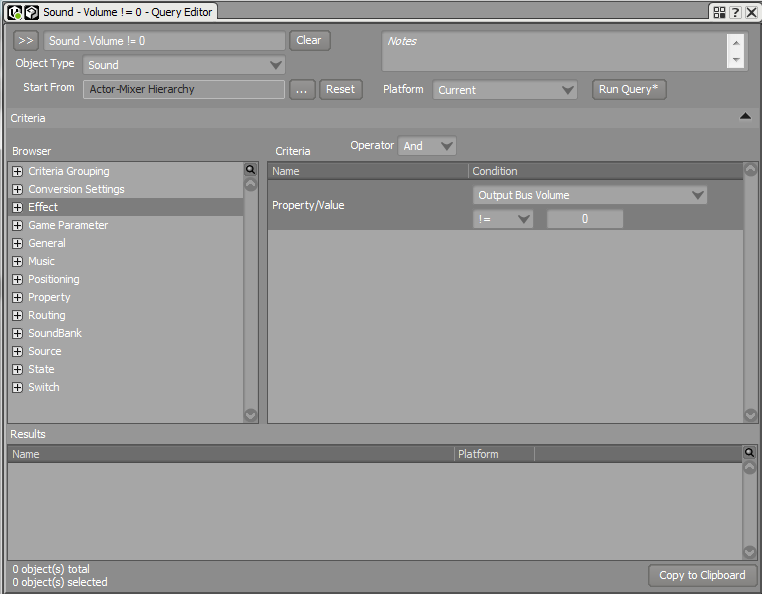
    At the heart of the Query system is the Query editor. When we open a Query in Wwise, we are shown the Query Editor. We’ll break down the components of the Query Editor, but it is worth noting that it’s a fairly complex tool in regards to the number (and nesting) of settings you have access to, so it is highly recommended to spend some time with the interface to become familiar where some of the common settings live.

    QueryEditor_top

    The top of the Query Editor shows us the name of the current Query and from here the information begins to flow down. The first thing we need to do is decide what type of Object we want the system to find. This can be any structure within Wwise from a Sound to a Random Container to a Music Segment and so on. Click the drop down in the Object type and scroll through to see all the options you have. Whatever you select here will be the object type that Wwise returns when you run your Query. If you want an inclusive search of all structures in your project, select All Objects.

    Next you can choose where you want the search to start from. Clicking the ellipsis next to the “Start From” box will open up a window where you can select a place in the Actor Mixer Hierarchy or the Interactive Music Hierarchy or the entire project. Wherever you choose, the Query will perform a recursive search from. So if you choose the Actor Mixer Hierarchy it will search every structure in every work unit, whereas if you select a single work unit, it will only search through the contents of that work unit.

    You can also select the Platform if you’re working on a multi-platform project so you can search for All platforms or just a single one if you need.

    The browser window

    QueryEditor_browser

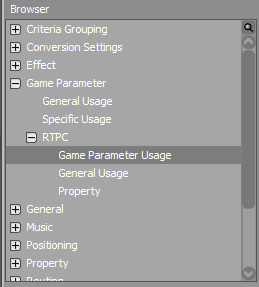
    The browser section of the Query Editor is the meat of the system (or the protein-rich meat substitute if you’re vegetarian). The browser contains a series of collapsed categories and it is here that you can begin to select the logic and parameters you wish to search for. While this is the most powerful part of the Query editor, it is also unfortunately the most obtuse as well. It is often not super intuitive to find the parameter you’re looking for as it may be buried in a category you weren’t expecting, or given a generic name with a dropdown that will reveal the settings you’re after. Fortunately, if you’re on Wwise version 2015.1 or later you have the ability to search and filter within the browser by clicking on the tiny magnifying glass above the scroll bar. This will bring up a text field which you can type and the contents of the browser will filter its contents to what you’re typing. My advice is to actually spend a little bit of time looking through all of the categories in the browser, open up each one, click each option and see what lives in there. Having a cursory knowledge of these contents will help you create more powerful custom Queries later.

    Criteria

    QueryEditor_criteria

    When you select an item from the browser window, it displays in the Criteria window to the right of the browser. The Criteria window takes these generic categories and allows you to get a bit more specific with a variety of tools from simple drop downs and checkboxes to conditional statements. In the example above, I am looking for objects which use a specific RTPC. Also notice that the Criteria name shows you where in the browser that specific element is located (Game Parameter -> RTPC -> Game Parameter Usage). This is another area where the depth lends itself to a layer of complexity that is best understood by actually clicking through some of the options to see what is available to you.

    Above the criteria window is an Operator dropdown. When you create multiple criteria for your Query, the operator allows to you say if you want all of them to be required to return objects in your search (And) or any of them to be allowed but not required (Or).

    Results

    Results returned by a successful Query

    Once you have all of these pieces laid out, you’re ready to let Wwise do the work. Click the Run Query button at the top of the editor, and if there are any objects that match the Object Type and Criteria in the scope of your search they will display in the Results window at the bottom of the Query Editor. From here you can select them and do a multi-edit or you can begin looking at individual objects to make adjustments or troubleshoot.

    Essentially, what you’re doing with the combination of criteria and operator is creating a simple logic question for Wwise to answer. If you’re trying to find information about some sounds in your project, another way to approach it is to write it out a question and then build your query based on the criteria you’ve written out, such as “What sequence containers in my weapons actor mixer are set to continuous and use a trigger rate of less than 0.25 seconds?” To create a Query to return these objects, set your Object type to Sequence Container, set Start From to your weapons actor mixer and select Property values for continuous playback and Trigger rate (which you’ll set to < .25). Make sure the Operator is set to And and you’ve just answered your question!

    Some examples

    Even with the breakdown above, the Query Editor is a bit daunting. Fortunately, Wwise ships with an entire Factory Presets work unit full of very useful queries. Not only can we use these to find elements in our project, but we can also use them as a springboard to start making our own queries. Let’s take a look at a couple of these to see how the Query Editor works:

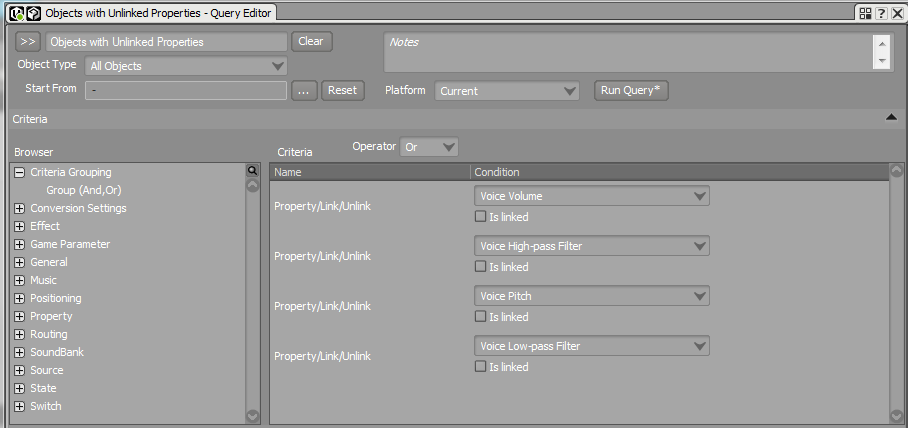
    A Factory Query in Wwise showing how to find unlinked objects in a project

    For those of you who have ever worked on multiple platforms where you needed to make platform-specific tweaks or changes to various objects, you know all too well the process of unlinking parameters from the “global” state of Wwise and having platform specific values. (For the uninitiated, you can break the connection of a slider and have Wwise apply different values for different platforms. So if you were working on a game where, for example the PC version had a different mix or number of variations than the Android version you do this via unlinking in Wwise). In projects like this, it’s common that some objects are unlinked but the majority remain linked. Perhaps you want to see all the objects in your project that are unlinked to get a sense of how different the platforms are. The image above is Audiokinetic’s preset for Objects with Unlinked Properties Query and it will do just that: show you all objects with unlinked properties. If we look at the Criteria in the Query Editor we can see that it’s basically looking for any objects (due to the OR operator) where the Volume, Pitch, Low Pass or High Pass filters are NOT linked. This Query will then return all objects in your project that have one of these objects unlinked. Drilling down through the Factory Queries is a great way to get comfortable with where various items live and what their tweakable parameters are.  Lets look at another couple before making our own.

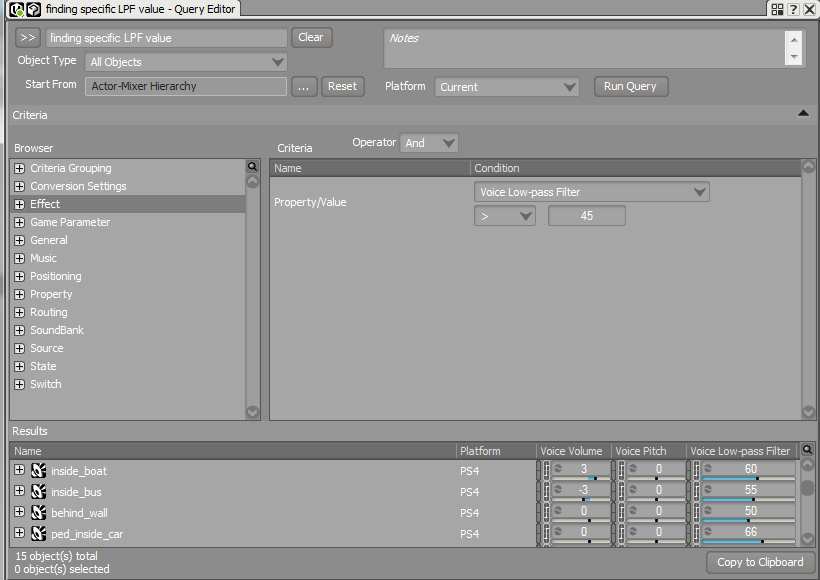
    I’ve had bugs in my projects more often than I’d like to admit where my sounds are suddenly inaudible. Usually I’ll use the profiler to try and track down what is going on (which is fodder for a wholly separate article). The issue often lies with the additive nature of filters. I may have a low pass filter on a sound, and then a state or two may be active which also tweak the filter. The exponential nature of the filter means that while each of these modifications may be minor, they add up quickly to muddle the sound to the point of inaudibility. When troubleshooting what may be causing the excessive values, I’ll often look at the voices tab in the profiler and if I see a pattern in the LPF values or abnormally high values, I’ll then run a query looking for LPF values either at an explicit number or above a certain value. The image below shows a query of all objects with an LPF value greater than 45 as well as some objects it has returned. Note that you can change the conditionals in the criteria so you can look for values greater than, less than, equal to, etc., to pin down what you’re looking for.

    SpecficE xample With Returns

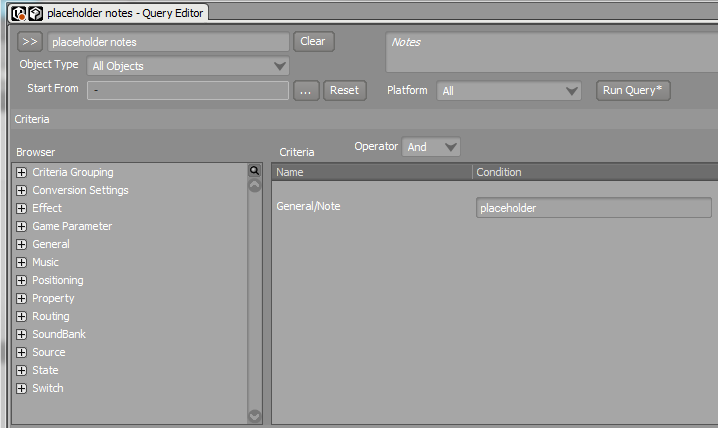
    Now let’s say you use the Notes field in your project to help communicate with your Future Self about the state of things in the project. For example, when you add a placeholder sound, you add a note in the Notes field saying “placeholder.” With Queries, you can easily run a report to find all those sounds with a Note that reads “placeholder.” In the General section of the Browser is the item for Note. Type “placeholder” into the Criteria, run the Query on your project, and voila! All your placeholder sounds appear in the Results window. From here you can Copy them to the Clipboard to create a list for your reference, multi-edit them to remove the note, or modify them as you wish.

    A query showing a search for objects with a specific string in the Notes field

    Putting it all together

    So hopefully now we understand the basics of the Query Editor. Let’s create one for ourselves! When adding music to the Interactive Music Hierarchy, the Music Segments are not set to stream by default and doing so manually requires drilling down a few containers to get to the Music segments to tag them as streaming. It’s kind of a pain when importing multiple files at once. So let’s create a query to find all music segments not set to stream. Once we get these, we can easily multi-edit the list to make the ones we want stream.

    First off, we need to create a new query. Like any structure in Wwise, this is as simple as creating a child Query within a work unit in the Queries tab like so:

    CreateQuery

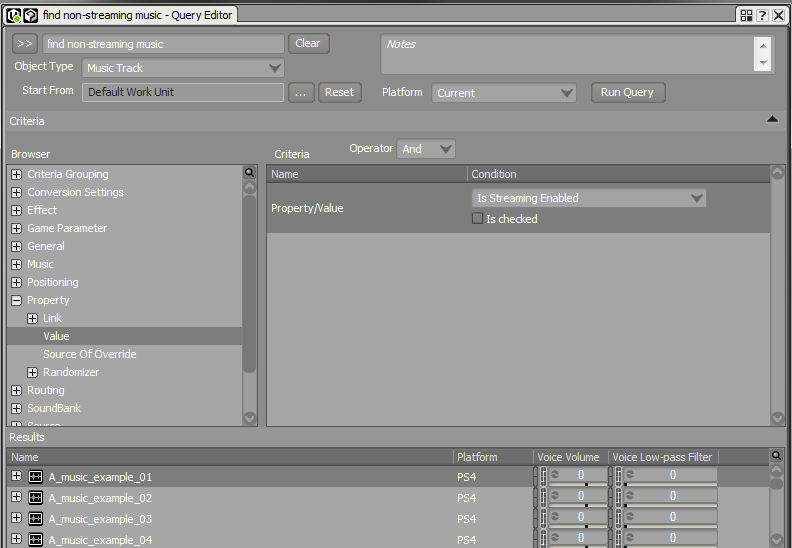
    Next we’ll want to build our new query. I’m only concerned with Music Tracks in this instance since those are the music objects which contain the Streaming flag, so I’ll set the Object Type to Music Track. I select my Start From point as the Default Work Unit in my Interactive Music Hierarchy. In the browser, I open up Property and double click Value to add that item to the Criteria. I select “Is Streaming Enabled” from the drop down and keep the checkbox unchecked. Now this will find all Music Tracks in my Default Work Unit that are not set to stream. I click Run Query and a list of non-streaming music tracks will display in the Results window at the bottom of the Query Editor. I can now select those I want to stream and press Ctrl+M to bring up the multi-edit window and check the box to Enable Streaming. All done!

    New_MusicNotStreaming_query

    And that’s a cursory view of using the Query editor and how it can help you troubleshoot bugs and speed up workflow. It’s a very deep tool and one that definitely takes some playing around with to really grasp the breadth of its capabilities. If you are looking for information about content in your project, you can find what you need using Queries. The Factory Queries provided are a great jumping off point, followed by experimentation on your own and sharing/discussion with the community. What is shown here really only scratches the surface, and the level of complexity you can build with queries is really only limited by your imagination.

  • Quick tip: using templates in Wwise

    (this originally appeared as a post for designingsound.org)

    Like any tool in a game developers toolbox, Wwise is a deep, complex program with an owners manual longer than most novels. Who has time to read through an entire manual these days? I wanted to show off a simple, often overlooked feature in Wwise, which may not be readily apparent to someone who hasn’t read the manual. The ability to import a folder structure and apply a Wwise structure as a template to it can save a ridiculous amount of time when setting up structures which may have a similar layout to other ones already in your project. With a little forethought and a few mouse clicks, the process of setting up complex structures in Wwise becomes an automated dream.

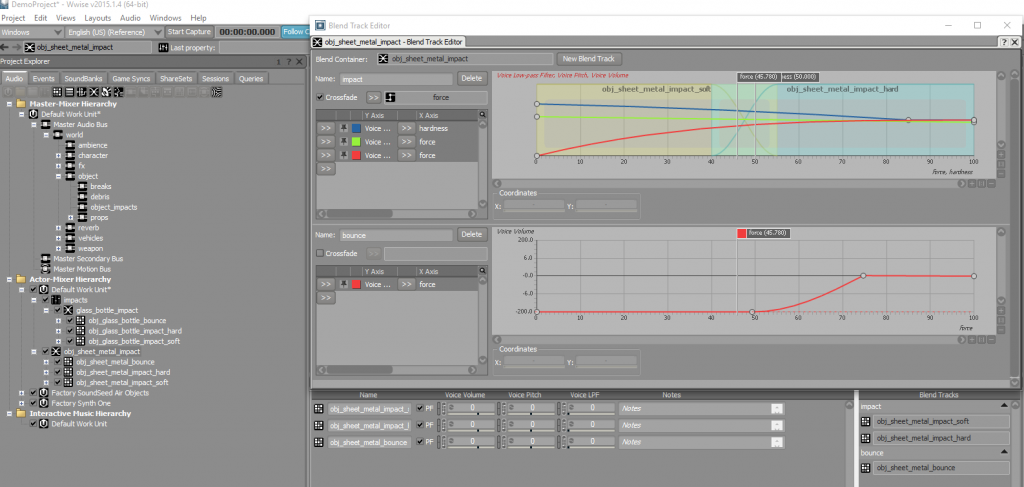
    To start, let’s say we have a series of impact sounds which blend between soft and hard impacts based on the force of the impact and an additional layer of bounce sweeteners which only play above a certain force. We also do some filtering and pitch randomization based on the force and hardness of the objects colliding (via an RTPC). This is organized in Wwise as a blend container with some child random containers which each contain audio files:A blend container layout in Wwise we'll use as a template for importing a new structure. Click for a larger, readable version.

    Now let’s start thinking about each of these structures as a folder. If we want to use this structure layout elsewhere in Wwise, we can “re-build” or emulate this structure layout in Windows using folders. Where we have structures in Wwise (their nomenclature for containers, actor mixers, virtual folders, etc.) we create folders in Windows which will serve as a guide for Wwise when we import new sounds. A Windows folder-based layout mirroring the impact structure above would look something like this:

    Windows folder layout which corresponds to the structure layout you wish to emulate in Wwise

    Similar to the blend container in Wwise example above, we have a “master folder,” in this case obj_sheet_metal_impact, which contains three folders: bounce, impact hard and impact soft and within each of those folders are corresponding wav files. With a folder structure in Windows that mirrors the structure we want in Wwise, we can import into Wwise complete with all of our bussing, RTPCs, crossfades, etc. created for us! (As an aside, I always build my folder structures directly in the Originals folder so that the organization is already in place without having to move wav files and folders around as an extra step in the File Manager).

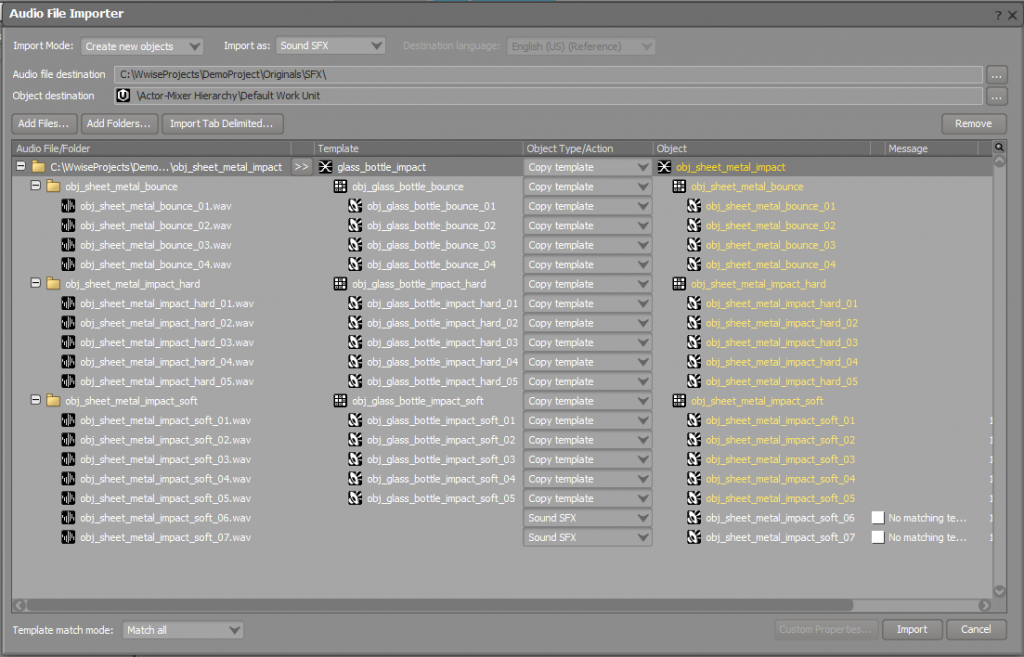
    Once your folders are laid out in a similar manner to your Wwise hierarchy, open the Audio File Importer in Wwise and click the “Add Folders” button. Navigate to the top level folder of your new structure, in my case “obj_sheet_metal_impact” and click “Select Folder.” This will open that folder in the Audio File Importer. You can now assign each folder level as a different structure in Wwise such as a random, sequence or blend container. The magic, however, happens when we click the arrow in the Template column and select “Browse” then navigate to an existing structure whose layout and parameters we want to emulate:

    The Wwise template layout

    As you can see Wwise automatically fills in which structure each folder should represent and even handles having more (or less) audio assets in a folder. Shuffle things around as/if needed, then click Import, and you’ll have a new structure mirroring the template structure complete with all rtpcs, crossfades, etc.

    Our new structure with all template properties applied

    Once we import the folder structure using an existing structure in Wwise as a template, we’re then free to tweak it to our hearts’ (or games’) content, but most of the grunt work has been taken care of through some simple folder organization. Happy templating!

  • Trip report: Satsop nuclear power plant (Glass recording)

    On October 6th, I had the privilege to join a few other sound designers (James Nixon, Kristoffer Larson, Pete Comley and Andy Martin) on a trip to the Satsop Nuclear Power Plant out in Elma, Washington about a half hour west of Olympia. While we bore a ridiculous number of radioactive jokes afterwards, the plant was never finished and thus never had any actual nuclear material near it. Construction began in the 70s during the energy crisis and in 1983, after falling $60 million over budget, they canned it. It was apparently about 75% complete. The county of Grays Harbor has now turned the complex into a business park, so there’s a handful of businesses out there and various films, music videos and performance groups also rent it out from time to time. James Nixon had wanted to record some large glass breaks, and when he opened up to the group to see if anyone would be interested in breaking shit at a nuclear power plant, the sentiment was “I would be completely insane to say no!”

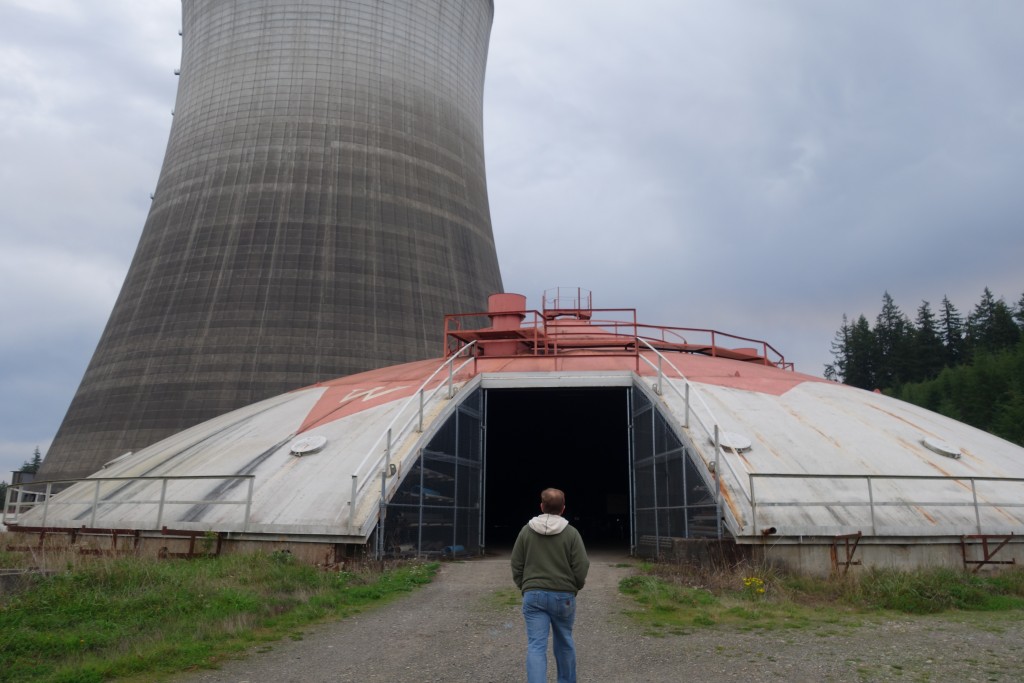
    We had the run of the place from 8am until 4pm on a gray, overcast Tuesday. I’ve seen the cooling towers from the freeway on the way to the Olympic Peninsula, but it was a completely different thing to be standing right under one. They were huge! We signed releases to climb up the stairs along the outside all the way to the top, but alas, we didn’t have time. We did walk around though, scouted out a space to do our glass breaking and also scouted some areas to capture impulse responses and the like. The picture below shows one of these spaces: what was meant to be a cap to an unfinished containment unit is now a parking garage with some insane reverbs inside.

    Andy walking into the bat cave, aka the cap of a containment vat turned into a parking garage.
    Andy walking into the bat cave, aka the cap of a containment vat turned into a parking garage.

    We burned the morning trying to figure out how to rig the glass. James wanted the break sound isolated from the debris that would come with just throwing the panes on the ground. While he was working on figuring that out, Andy and I did a little exploration into a side alley which had some amazing reflections that changed radically from the entrance to the back of the alley. In the back of the alley were some 15 foot long pieces of rebar that we started playing with. Andy grabbed one and started dragging it along the floor and the sound was insane! So we recorded a bunch of that and some other rebar in the alley fun.

    By then, we had gotten the maintenance crew to bring a man basket lift (a silly, sexist name if there ever were one) and we began figuring out how to get the glass set up so it could be broken safely with a few milliseconds between the impact and the shard fall. The plan was to have 2 people on the roof of the moving van we rented, but the roof was fiberglass with a few metal support ribs. Good thing Andy is a small human! He was volunteered to be the man on the truck breaking the glass. The rig called for a rope running from the truck with 2 suction cups attached to it, going up through the man basket and back down to the back of my car where we tied off so we could easily hoist new panes of glass up for each break. Andy would break each piece with a hammer or crowbar and await the next one to be hauled up.

    We set up a ton of mics through Kristoffer’s Nomad recorder, 4 Sound Devices 702’s and a couple other field recorders. I think in the end we had a Sennheiser MKH8040 stereo pair on the truck pointing toward the impact. James and Pete and I each had 8060s pointed at the impact areas. We had Pete’s Neumann binaural head (aka Fritz) near the impact area as well as a few other close mics. I had a Shure KSM141 stereo pair pointed at a concrete wall just off from the impact zone to capture the reflections and Andy had his Omni M/S rig in the alley we were playing in. We also had a couple contact mics set up in interesting places (attached to a small satellite dish and one to the rental truck) which actually got some pretty decent recordings. Kristoffer ran the main recording area, capturing 8 tracks from around the impact site into his Nomad. Pete and James were both operating their booms, Andy was destroying, and I was tucked into the cab of the truck recording with my 8060 and monitoring Pete’s rig. In between breaks we all ran whatever tasks were needed: Pete would sweep out the existing glass, James would prep the next pane, Kristoffer logged the recordings and helped me with stopping some of the remote recorders, and I would stop the remaining remote recorders, get in my car to lower the rope and raise a new pane, then run around in a tizzy turning the recorders back on and hopping in the cab to do it again. Chaotic sonic fun!

    Satsop is a business park and there’s some other industrial areas nearby including a power plant, so it is not a completely quiet place. We were plagued throughout the day by truck backup beeps, riding lawn mowers, strange radio squawks, wind, etc. But we got some surprisingly clean and diverse recordings of a broad range of glass from mirrors to plate glass to bottles to wine goblets (which made an awesome whooshing sound as they traveled through the air) and lightbulbs which sounded way more powerful and percussive than their size betrays).

    It was a super successful day, but unfortunately we had no time left after breaking all the glass and cleaning up to record anything else. We’re planning another trip soon hopefully to capture impulse responses of various rooms, buildings and spaces (1000 foot tunnels!) and whatever else suits our fancy. Here’s a compilation of some of the breaks I captured with my Sony RX100 camera. The recordings via our Rycotes sound much cleaner (no wind) and as far as those truck beeps, well that’s what RX is for!

  • Best practices in using the PS4 Dualshock controller speaker

    The controller speaker in the Dualshock 4 is pretty damn cool, though it’s by no means the first of its kind. The Wii Remote famously had a speaker in it which was used occasionally. The archery and fishing sounds from Twilight Princess were the first time I really noticed its use. In the Wii version of Spider-man Web of Shadows we played Spider-man’s web flings out of it. It was a fun novelty, but not the best quality speaker. The Wii U has not one, but two speakers!  Stereo sound on a controller. Now that’s awesome! (or possibly overkill). The PS4 DualShock controller has a single speaker, but it’s a nice quality one (the same as the Vita speakers). In my time playing with it, I’ve come up with a set of best practices I would like to share. I think these concepts apply to the Nintendo controller speakers as well, and probably any environment where you have a “special” speaker close to the player, yet separate from the normal sound field:


    Mind the (Latent) Gap

    The Dualshock 4 controller connects via bluetooth and with bluetooth comes inherent latency. For this reason, you really shouldn’t try synching the controller speaker with the game speakers. It just won’t work consistently well. Maybe it will one time out of a hundred, but every other time, it’s going to be off by some amount, which can be a little disorienting. The discrepancy between the timing of the controller speaker and game speakers is fine for more amorphous sounds, but for anything the player needs sample accurate cognition of (like critical dialogue) choose one or the other. There are some really cool techniques you can do with dialogue, which I’ll touch on further down.


    Treat it like an LFE

    The LFE channel of a surround system is commonly known as the subwoofer (the speaker it plays out of), but LFE itself stands for Low Frequency Effect.  The key word here being “Effect.” If you’re constantly hitting the sub with sounds, not only does the mix start to feel muddy and fatiguing, but you also dilute the power of the LFE’s intended purpose: to emphasize key, special moments or events. I strongly believe the controller speaker should be used in the same manner. Make sure what you’re sending through it has purpose and reason. Generally speaking the best sounds to send through it are UI/notification sounds and “first person” sounds, or those that make sense to the player when they emanate directly in front of him/her instead of in the landscape of the room speakers. By no means are these the only categories of sounds you can use the speaker controller for, but it’s good practice to ensure you’re not breaking immersion through its use (unless of course that’s your intention).


    Avoid using it for critical sounds

    As designers, there are a lot of unknown factors we need to consider when deciding what to pump through the controller speaker. Listening environments vary greatly and sometimes the noise of a child crying, a dishwasher running, or a friend yammering endlessly about how awesome they are can completely overshadow the sounds coming through the controller speaker. Furthermore, users can adjust the speaker volume in the system menu, and while there are now ways to query that volume and ideally use that information to determine whether to route a sound through the controller speaker or the main mix, it bears considering that sounds you want to emanate from the controller speaker may not be heard by the player. For this reason, I recommend not using it for any critical sounds that the player absolutely must hear. Whether or not you follow this advice, always design a contingency plan for any controller sounds you want to ensure the player hears. If they’re using headphones, if the controller is turned down, etc. In a perfect world, the PS4 would know via its HDMI connection what the audio setup of the user currently is (headphones, stereo, 5.1, etc.), and with a microphone attached to the system, we could be sampling the ambient noise of the room and adjusting the mix dynamically as Rob Bridgett suggested in his recent GDC talk on adaptive loudness. If these two concepts were achieved, the engine could determine when to send your controller sounds to the controller speaker and when they need to be diverted to the main mix instead. But until we get there, have a plan in place for controller sounds the user must absolutely hear.


    Be creative!

    The speaker controller is a fun tool and can really add an extra level of immersion beyond the normal mix. We received a lot of positive feedback for our use of it in inFAMOUS Second Son: from the ball shakes of the graffiti can to the way we used it for draining powers (the drain sound started at the source of the power in the world and slowly moved into the controller speaker as Delsin absorbed the power), and there’s tons of other developers out there doing neat stuff with it. I loved how Transistor played the narrator’s voice through it (only if you select to use the speaker in the options menu), but still sent the reverb sends to the main mix. It created a fantastic sense of your sword intimately talking to you, but still being in the world (and by only having the dry mix go through either the mains or the controller they avoided the sync issues of sending the VO through both). The Last of Us Remaster did a similar feature with their audio logs. Shadow of Mordor had a great example of a first person notification in playing a bush rustle sound whenever the player would enter high grass. It helped communicate to the player that they were in cover using an in-world sound rather than a possibly-immersion-breaking UI sound. The bush rustle sound also brings up one last point: while it is a decent quality speaker, it’s still a small speaker in a plastic housing, best to keep it relegated primarily to mid and higher frequencies.

    Perhaps we need to give the speaker controller a fancy acronym akin to LFE to help explain its best uses, something like Personal Mid-to-High-Frequency Effect (PMtHFE). Although that’s more syllables than “speaker controller,” so let’s just remember to use it wisely.

  • The Sound Design of inFamous Second Son: Video Powers

    Of all the powers in inFamous Second Son, Video powers may have been the most esoteric. I mean smoke at least has an analog in fire (and we used some fire elements in both the visual and sound design), but video? You think video, you may think laser, but we already had a neon power (which was even sometimes referred to as laser). So how the hell did we get something sounding as unique as our video powers without treading on the other power sets?

    Part of the answer is interestingly with how the power set itself was initially conveyed to the team. Video power was actually called “TV power” internally for most of production. Heaven’s Hellfire, the video game that Eugene, the video power conduit, is obsessed with was initially a TV show. We realized after many months that it made more sense to make it into a video game instead and that would open up more avenues for us to play around with in the gameplay (such as the mildly retro boss battle).

    But we still had “TV powers” stuck in our brain and when Andy and I began brainstorming about how to make sounds that were powerful and unique and “TV like” we started thinking about televisions. We stalked thrift stores around town hoping we’d come across some old 1970s vacuum or cathode tube televisions to take apart and record. We failed there, but Andy eventually came across a couple old CRT TV/VCR combos. Double obsolete points! We brought these into the studio and proceeded to record all kinds of sounds with an array of microphones from shotguns to contact mics to crappy telephone microphones which did an amazing job of capturing bizarre electromagnetic interference around the power supply, and other surfaces. We recorded all possible permutations of power on and power off sounds and even got the VCR mechanisms to give us some very bizarre whines and hums. We also did some recordings of the Sucker Punch MAME arcade cabinet which has a very old CRT monitor in it with tons of wires exposed, as well as a shortwave radio I’ve had for years, but never really needed for a video game sound before.

    We recorded all of these sounds at 192kHz and the frequency content of the recordings on the CRT monitors at the higher frequencies was pretty astounding. While some of them we had to remove the >20kHz content to save our ears and speakers, Andy also did some pitch shifting to play around with some of these normally inaudible sounds and they became part of the video power palette.

    A few words on the telephone microphones we used: they are cheap and really neat for recording electromagnetic interference. Although Radio Shack may be dead and gone now, you can still get them online. It’s pretty neat the wide array of sounds you can get from one of them by waving near essentially any power source from a monitor to a computer, plugs, etc. Basically any electronic device will give you some interesting content. For a lot of the TV powers, Andy took various EMF sounds and morphed them together using Zynaptiq’s Morph plugin.

    So, similar to our other power sets, below is a video showing some of our field recording as well as the final in-game sounds.  What’s different here is that the video powers were finalized later in the project and we were so focused on finishing the game, that we did not make a fancy, fun video for the team. So, it may not be as fun as the previous videos, but still shows what we recorded and how it ended up sounding.

  • The Sound Design of inFamous Second Son: Concrete Powers

    It’s hard to believe that inFamous Second Son is a year old already!  I’ve been completely lagging on finishing up these posts about the powers design for the game, so let me use this opportunity to make good and present the first of the final 2 parts of this series. I will hopefully get around to posting my presentation on the Systems Design for the game soon as well so those who haven’t heard/seen it can have the information available to them. Anyway, on to the magic and mystery of concrete!

    For those who haven’t played or seen inFamous Second Son you play a guy who gets superpowers battling an authoritarian government agency called the DUP whose soldiers are all imbued with concrete superpowers by their leader Dana Augustine (as normally happens with government agencies).

    The biggest challenge for us with concrete was how to make it sound unique. It’s just rocks and stone right? We’ve all heard countless variations on rock sounds in everything from impacts to destruction and rubble/debris sounds. We needed to figure out ways to make our sounds stand out as unique, while also conveying the power of the enemies in the game who used concrete.

    The powers ran the gamut from concrete grenades to spawning concrete shields to launching off spires of concrete and forming a concrete balcony on walls. In short there was tons of concrete objects being created and broken in the world. Not only did we need these to sound unique and “powered” but they also had to sound completely distinct from all the “normal” concrete in the world you could destroy or collide other objects with. It was a huge challenge, but one that Andy Martin was definitely up for.

    The place to start, naturally, was by buying a bunch of concrete. I looked into the process of concrete, which is usually just a mixture of water, an aggregate like sand or gravel, and Portland cement (named after a type of stone used in the UK, not the sleepy hamlet of the Pacific Northwest of the US). While the thought of mixing up my own concrete sounded appealing to my construction worker wannabe side, we weren’t in a position in the project where we had limitless time to experiment. So we did the next best thing: went to Home Depot. Andy and I both made trips to the hardware store and bought all kinds of concrete and stone, from paver stones (which were often too resonant) to clay bricks, cinder blocks, and more. They were demolishing a building across the street from my house and I noticed some particularly large chunks of both asphalt and concrete sitting on the other side of the fence. I waited until nightfall, donned my ninja costume (really just a bathrobe with a scarf tied around my head) and absconded with the almost-final resources we would need to make our concrete powers come to life.

    From here, Andy began to run wild and experiment with all kinds of torture he could enact on our various pieces of concrete. From scraping everything against the slabs from metal disks to binder clips to resonating a jews harp against them to, yes, crushing, beating and destroying, he created an elaborate and unique palette of concrete sounds. As a few of the characters in the game developed, their powers also evolved. Some characters now had “beams” of concrete they would shoot out to shield allies while another burrowed underground like Bugs Bunny on his way to Albuquerque, and another sat atop a giant swirling tornado of concrete chunks. We needed something unique here and I devised a way to record a constantly moving collection of some of the concrete chunks we had broken (and wrote up a blog post about it here).

    Andy’s wizardry both in recording these sounds and in shaping them in ProTools and Wwise into the layers of concrete powers was top notch as always and now it was time to show the team what we’d been doing (and that our jobs are more fun than theirs). Below is another Sonic Equation of sorts which we showed at a company meeting demonstrating some of recording techniques used to make the concrete powers of Second Son:

    Thanks again for reading. I hope to get a write-up of the video powers (which naturally entailed a lot of fun creative recording and manipulation) done next week in time for the proper anniversary of Second Son’s release. Stay tuned!

  • GDC 2015 recap

    GDC 2015 has ended and those who weren’t there have gotten their information solely in 144 character fragments. I wanted to write up a quick post of my experiences at the conference, key takeaways, etc. to give those who weren’t able to there a (slightly) more comprehensive idea of what transpired.

    To be clear, there was no drinking, having fun, or gallavanting because we’re all professionals and don’t have time for such shenanigans.

    The big takeaway from the week as a whole is that everyone is interested in VR and 3d audio, but we’re still figuring out what to do with it.

    I arrived Monday night, not to hit audio bootcamp on Tuesday, but because I’m lucky enough to work for Sony and have the opportunity to be a part of their Game Technology Conference before GDC in which I sit in a room with some of the most talented game audio developers in the world and talk about game audio. We heard talks from Evolution studios, some of the Morpheus team, and others from SCEE and SCEA. Talented folks. Here I am sitting in a room with guys from Naughty Dog, Sony Santa Monica, Bend Studio, Sony Cambridge, London, Evolution, Sony Japan, Insomniac. It’s a very humbling experience being surrounded by such incredible, inspiring talent, all the while having great discussions to further inspire and innovate.

    I actually cut out of conference for an hour to catch the beginning of the Audio Bootcamp and Jay Weinland’s talk on Weapon Design in Destiny.  I always enjoy talks where people share some screenshots of their Wwise projects. I find it fascinating how we all use the tool in different ways to sometimes do similar things and other times create totally innovative concepts. The two big “that was cool” moments from Jay’s talk which have been done elsewhere, but were elegantly implemented: the notion of silence duckers: using a Wwise silence plugin with 0.1 second length played with an explosion to duck most other sounds by 12dB for the .1 seconds with a .2 second recovery time to carve out some space for the explosion without being detectable. Also their passby solution for rockets in which they created several sounds of the same length with the pass by the listener at the same spot in each file. Based on velocity of the object they trigger the sound based on when the midpoint should go by the listener and if it’s too late to start the sample from the beginning, they seek into it.

    One final comment about Audio Bootcamp: since the beginning it’s been more of an “introduction to game audio” day. This year it seemed far more like an extra day of the audio track. So many interesting speakers and talks on music, technical sound design, VO, etc. Pretty cool that audio has so many compelling topics that it takes more than the 3 day conference to cover all pertinent info.

    Wednesday started with a talk from Jim Fowler of Sony talking about using Orchestral colors in Interactive music. While it was a bit esoteric for non-music people, Jim did a fantastic job of presenting a great concept in regards to working with music stems: rather than arrange music by instrument or section, arrange it by function within the score. He then showed how he marks up charts for an orchestra so they can tell what they need to play when. Really neat concept, and some lovely dry, British humor to boot.

    I then headed over to my one non-Audio talk by Alistair Hope from Creative Assembly on building fear in Alien Isolation. Unfortunately it was only a half hour talk, but somehow he managed to get through all of his content. The key takeaways here were how they used prototyping to figure out their concept and then stayed true to the concept through further testing. These guys really get the meaning of the term “grounded” in regards to design and how something is grounded when it makes sense in the world you are building, rather than the real world. Interestingly they toyed with making it a 3rd person game at one point due to the fact that most other survival horror games have been 3rd person and there was also the conflict at the time with FPS Aliens Colonial Marines. In the end they found that 3rd person felt like an Alien game, while 1st person felt like Alien, so they stuck to their guns. The last, most important thing, which should apply to all projects were their Key Universal Learnings. The seem so self-explanatory, but are definitely worth reminding ourselves (and our teams) of when working on a project:

    • Have a Strong Vision
    • Everything should work together to support that vision
    • Deliver strongly on the vision
    • Believe in what your doing

    Next up for me was a talk from Harmonix on creating the interactive musical experience of Fantasia. My one wish for this talk was that they brought a Kinect along because it was cool to see some movies of their prototypes in Max/MSP and Live, but watching the movies of gameplay made we want to see how the 3d motion of the user caused various changes in the music. Still it seems like everyone that works at Harmonix is a musical tech wizard and they definitely have a lot of fun developing their gameplay.

    Wednesday concluded with a talk from Monolith about Shadows of Mordor which was really great. Brian Pimantuan, the audio director as well as his programmer and staff composer did a really good job of showing how they set out to maximize emotional resonance in the open world environment of the game.  Some of the interesting things they did were moving the listener back to the player to make things more intimate and tie things closer to the player. Similar to Condemned, they added music stingers to impacts on Uruk Captains. Really nice, subtle touch of integrating music into sound design and increasing intensity. Also really dug they way they took a few queues for the Nemesis Orcs and made each one unique and reinforced each Orcs character by chanting the Orc Chieftains name over the music cue. Really slick. Also of note, though they barely touched on it, was how great the mix of this game is. So much going on and just a fantastic job of keeping everything balanced and sounding good.

    Thursday was the (almost painfully) long day. The morning began with Oculus’ Brian Hook and Tom Smurdon talking about their experiences thus far with audio and virtual reality. They had some interesting perspectives on how we need to handle audio for VR including all mono sounds and a very judicious use of music. Gone are the days of simple tagging of anim roots with sounds to be replaced with a joint-based animation tagging system since the immediacy of virtual reality means we need greater spatialization of near-field sounds. They provided a great, early insight to playing with audio in VR games. It also made me very excited and encouraged about the work Sony is doing on the same front. The Oculus programmer, Brian Hook, made a VST plugin of their 3d audio SDK implementation which allows Tom, the audio lead, to easily audition 3d audio sounds before getting them in the game. A nice touch and one we should (hopefully) expect to see for other 3d audio solutions soon.

    I had plans to troll the expo floor for a bit after the Oculus talk. I tried to see Nuendo’s implementation into Wwise 2015.1, but the line was too long, so I started to wander and ran into Mike Niederquell of Sony Santa Monica and Rob Krekel from Naughty Dog. We spent the next hour chatting about a gamut of topics including best practice uses for the PS4 speaker controller (perhaps a future blog post). Before I knew it, it was time for the next talk, which was Joanna Orland of SCEE talking about how to get a team on board and understanding your audio vision. Using the Book of Spells project she introduced the concept of creating a common language with the rest of the team so they could provide feedback to audio without being obtuse. In the Book of Spells example, each spell type was given an elemental name derived from natural sounds. If the rest of the team wanted changes to a specific sound they would use these elemental descriptions to help describe to Joanna the exact aesthetic they were looking for.

    Rob Bridgett gave a very compelling talk on adaptive loudness and dynamics in mobile games next. His talk was arguably about much more than mobile games and easily spills into handhelds and also has implications for consoles. Rob is doing some supercool stuff out at Clockwork Fox. Not only does he do different mixes and loudness settings via compression based on whether the user has headphones connected or not, he also uses the device microphone to measure the noise floor of the room to help determine optimal loudness for the game mix. Brilliant adaptive techniques which, given the availability of a microphone, should be used in consoles as well.

    Next up, Martin Foxton presented a talk on modular sound design using the Frostbite engine. His concept was essentially the notion of building sound events or in-game sound effects from smaller building blocks of sounds which can be reused as necessary and also creating templates for these sounds a la prefabs in Unity where you can create a script to carry over various settings for a sound. If you’re not already using modular sound design, it’s a great way to achieve variety while still maintaining sane bank sizes. It’s the reason every time you fire an R2 smoke bolt in inFAMOUS Second Son there’s 1024 possible derivations of the sound that can play!

    The final talk of Thursday was a mind blowing presentation by Zak Belica of Epic and Seth Horowitz of Neuropop, a neuroscience research company. Seth was pretty damn hilarious and I only wish they had another hour or two to discuss their concepts. The takeaway here was that sound was one of the fastest of your six senses (yes, there are six. Seeing dead people is not one of them, but balance is). Anyway, because audio is such a fast sense, especially compared to vision, it means there are fewer possible illusions we can play on the auditory sense. However there are some neat tricks: For example the sound of bacon frying makes most non-vegetarians salivate, especially when you show an image of bacon with the sound. Speed the sound up and show a picture of bees, and people think they’re hearing bees and feel a little more uncomfortable. They showed us a few other really neat tricks including modulating a sound at 18.1 – 22kHz to make the eyeball vibrate and create a discomforting feeling. Using infrasonic distortion panned alternatively left and right to create unease. And even why fingernails scratching on a blackboard used to give everyone such shivers when blackboards existed (the envelope of the sound is identical to a child screaming in pain). Seriously, we all need to do more research into neuroscience and how it affects or manipulates audio perception. There’s a lot we can play with there.

    By Friday, brains and livers were full, but there were still a couple more good talks to attend. Before these final sessions, I walked the expo floor and was finally able to check out Nuendo’s implementation into Wwise. It’s not fully realized yet (you can only import audio files, not folders which you can templatize into containers), but it’s a great start which I hope other DAWs will follow suit with. Needless to say, I’m starting to evaluate Nuendo now and hope they come to their senses, realize the opportunity they’re creating for themselves, and offer competitive crossgrades. There’s some great forthcoming features in Wwise 2015 besides Nuendo as well: calling events from other events, batch rename tool, profiler enhancements, optimizations, incremental bank building, advanced cache streaming and more.  Can’t wait to start playing with it!

    The afternoon started with David Collins and Mike Niederquell having an informal discussion about the sound design of Hohokum. Super awesome that they did a live demo during their talk. Not only are there not enough live demos at GDC, but watching Mike play through some of the levels made me really want to play the game again. It was cool to watch such a fun, light informal talk and also bask in the joy that is Hohokum. Seriously, if you haven’t experienced it (I would say “play,” but it’s less of a game and more of a audiovisual experience) you should definitely seek it out and give it a go!

    A perfect cap on GDC was Dwight Okahara and Herschell Bailey from Insomniac giving a glimpse into the open world sound design of Sunset Overdrive. Key takeaways here were that the audio team helped drive and sculpt the irreverent style of the game by implementing offbeat audio into early “gritty” concepts which brought the rest of the team around to the more fun style we now know and love as Sunset City. They showed off some of their fun tech like contextual storefront dialogue and the horde crowd/walla system and it was fun and refreshing to see such a talented team facing the same frustrations my own team does with streaming, lack of programming resources and other annoyances that plague our daily audiocentric lives.

    So that was the talks that I made it to. Granted for every audio talk I went to, there was another at the same time. I missed tons of great talks from Matthew Marteinsson of Klei talking about Early Access to  the PopCap team blowing minds with their work with Wwise and 5mb of memory to create Peggle Blast on iOS to Jon Moldover, Brian Schmidt and others talking about turning music games into instruments and more of an interactive experience.

    One final note which I’ve said so many times this past week and hope to never stop repeating: the game audio community is something truly special and wonderful. Hanging out with and meeting so many inspiring men and women and being able to openly share our passion is such a fortunate thing. Of all the people I met, hung out with, joked with, talked shop with, etc., there wasn’t an ounce of ego anywhere. Everyone in the community seems dedicated to each other and hellbent on push our entire industry forward together and I can’t express how lucky I feel to be just a small part of that experience.

  • The Sound Design of inFamous Second Son: Neon Power

    In contrast to past inFAMOUS games, Second Son was a tricky beast in that our power sets were pretty abstract. Electricity can really hurt someone, but smoke, neon, and video? This was definitely one of the many challenges we faced with the sound design of the powers. For neon, we took a pretty direct approach and then got creative with our source materials.

    We struggled early on with making neon sound “neon” and not “laser.” There was some confusion during development in which power we were making as those two words were often interchangeable. (Fetch even refers to herself at one point in the game as “Laser Girl”). Making her sounds laser-y was ok, but at the same time I didn’t want to tread on the hallowed ground of Ben Burtt. I actually cursed his name a few times during production because Andy had made some beautiful sounds that unfortunately sounded too Star-Wars-laser-gun. Andy  had a REALLY long spring (originally an induction coil for an industrial kiln we got from a local glass maker named Chris Daly) attached to the ceiling of his office. Whenever he would accidentally hit it, I would hear the telltale “pew pew” in my office next door.

    The first element we captured which really felt “neon” was an actual neon tube. We have a couple Sly Cooper neon signs in the office, so I took my Barcus Berry contact mic and attached it to one and got some really nice neon hum. For more variety we captured a bunch of fluorescent lights as well, both via contact mics and using a Sennheiser MKH 8060 to capture various flickering sounds of turning them on and off. I have a very old fluorescent fixture in my house that created some amazing sounds which we ended up using for neon power sources powering down. And Delsin’s neon drain was composed of several tracks of neon hum processed through Izotope Iris with various frequencies cutout and some filter sweeps.

    For the rest of Delsin’s powers, Andy got REALLY creative. As you’ll see in the video below no sounds were off limits and we used a broad range of varied sounds to create the final neon palette. Andy used Zynaptiq’s Morph plugin extensively to do some interesting blends of EMF interference and various hits on the aforementioned induction coil. Other tricks up our sleeve included an old signal generator I have which emits square and sine wave sweeps and some very cool power on and off sounds and a crazy electric shocking device from the 50s which would shoot small arcs of electricity at anything you put near it.

    Once we got our power set close to completion, it was time for another milestone meeting and thus time for another movie to show off our work. The response from the team from our previous movie, the smoke “Sonic Equation,” was so overwhelmingly positive, I felt compelled to do another. Sure the equation doesn’t EXACTLY equate to the sounds as they are in the game, but it at least shows off part of our design methodology as well as the fun we’re still having.

    Next time, we’ll discuss the enemy concrete powers and show some of the abuse we wrought upon varied chunks of concrete!

  • The Sound Design of inFamous Second Son: Smoke Power

    You know how sometimes you have lofty plans to do a project and then months later you think, “What the hell happened? I still haven’t gotten to that thing I meant to do months ago!” Well that’s pretty much where I’m at. I’ve been meaning to write a few short posts about some of the sound design we did on inFAMOUS Second Son for quite some time, and I’m FINALLY getting around to it. I hope this to be the first in a series of posts with an entertaining movie or two showing off some of the sounds we captured to make our various sfx in Second Son and how those ended up sounding in-game. Since the powers are the biggest sonic show piece of the game, I figured we’d start there.

    A lot has already been written about smoke power, but since it’s the first power you gain in the game, I’ll touch briefly on it one more time in part just to show you the movie below.

    But before that here’s something which may be of interest that has never been seen or heard outside of Sucker Punch.  The first thing we ever did in regards to powers on Second Son was to concept some ideas of what these powers may sound like. We had NO idea what they were going to look like (and as you can see from the video we were even concepting powers that never made the cut into the game). This was merely an exercise to start playing with sound and seeing what kinds of things were resonating with us in regards to these potential power sets. A lot of what we started with helped inform our extensive recording sessions to capture elements to mold and bend to our will. Other concepts we tried here didn’t work and were abandoned. For example, I thought it would be cool if the player’s footsteps had a sweetener applied to them based on your current power set. In the end it felt too heavy handed so we cut it. We played around with the notion of USTV feeds making their way into the video powers sounds (similar to Andy’s Neil Armstrong clip in the concept for what was then called TV powers), but that also just didn’t work in any meaningful way. None of the sounds you hear in this concept made it into the game, but it at least gave Andy, our senior sound designer, and myself a jumping off point to explore from.

    Smoke was the first power we worked on, but it was also one of the most challenging: how do you make something as amorphous as smoke sound powerful? Furthermore, how do you make it sound like smoke, and by that I mean NOT like fire. These were the challenges before us. I noticed some steam pouring out from a grate in the ground one day and thought that could be interesting. But it made no sound! We experimented with other air releases from helium tanks and compressed air, but none of it fit the bill. I pretty quickly gravitated towards charcoal. I don’t mean those neatly-formed imitation charcoal briquettes either. I’m talking real burned chunks of wood. I knew from ample barbecuing experience that they made really interesting crackling sounds when burned and also they had a resonance to them when moving around which was kinda unique. After buying a couple bags of charcoal and a small grill I set to work doing most imaginable things to these chunks of burnt wood: moving them around, bouncing them off each other, crushing them, burning them, lighting them on fire and then dousing them, etc. It was a great start. Many other elements ended up playing into the final sounds: surprisingly blowing air through a plastic tube became a very important element in Delsin’s smoke dash and various movements of sand also played a role in both quicker smoke attacks and Delsin’s navigation abilities. Below is a video showing off some of these elements as they were recorded and as they sounded in the game. One quick word on this video: it was originally shown as part of a company meeting. Every milestone during production, each team would show a short video highlighting their work over the past several weeks. We liked to show the team not only how much fun sound design is, but how much fun we have doing it.  Enjoy and stay tuned next week for an exposé on Neon powers!

  • The Evolution of a Feature: Diegetic Music in Infamous Second Son

    While I’m proud of so much of the audio design in inFamous Second Son, one feature stands out as a testament to never letting go of a good idea. It was a concept, not new or necessarily innovative, that began incubating around 7 years ago. It wasn’t until 2013 that I was able to make the idea work in a title. I thought it’d be fun to trace that feature from its nascent stages through to its full fledged life. To do so, we have to go all the way back in time to a year we called 2007. Ah 2007! There was a palpable hum in the air. The iPhone was introduced by a little upstart company called Apple, Microsoft excitedly released their newest blockbuster (*cough*) Operating System, Vista, and the Nintendo Wii had captured people’s hearts, minds, wrists, and pocketbooks.

    I was working at Shaba Games, where we had just finished up the DLC/Gold Edition of Marvel Ultimate Alliance and were looking for a new project. Like many others, we were captivated by the Wii and began working on a concept for a downhill skateboarding game for the platform. Shaba’s other sound designer, Lorien Ferris, and myself began brainstorming ways we could introduce interesting audio to what would ostensibly be a multiplayer racing game. Obviously the skateboard sounds would reign supreme and we came up with an idea of emitters tied to occluder objects such as buildings which would play a quick whoosh as you passed them (an idea I would later harvest for the mobile title, SummitX Snowboarding). Another idea we had was to have music emanating from buildings as you skated by. You’d be going fast and could never go back uphill, so they could be short loops, and once we applied some doppler it would sound awesome!

    Unfortunately, while the Wii as a piece of hardware was popular for a slew of years, the software didn’t seem to sell as well, so the project was scrapped before we got very far. BUT after multiple other false starts we were finally given something wholly different and rather exciting: Spider-Man, and what would eventually become Web of Shadows. The goal was straightforward: create a new, unique open world Spider-Man game using the engine from the recently released Spider-man 3. Once again Lorien and I dove into brainstorming cool new features we could implement on the audio front to push the superhero qualities of Spider-man and the real life interactivity of the city. Early on, our storefront music concept was revived. I even added some various loops to embed into some stores simulating dance and jazz clubs and restaurants. Unfortunately we ran into some design problems early on: the storefronts we had in the game didn’t really match the music, they were destructible but we didn’t have a signal to turn off the music when the store was destroyed, and truthfully it just didn’t sound super-convincing to have the sound of filtered talking and clinking dishes and glasses of a restaurant while you’re right outside fighting. You think there’d be screams and hushed whispers. Basically with a tight schedule and a skeleton crew, our storefront music plans would have to wait for another day…

    …which came just a year and a half later. We were working on a new superhero title and, with so much of the infrastructure in place now, we spent some time focusing on how to make storefronts believable. We created a multi-stage approach: idle, which would be the default and would play a basic ambient loop. For example some cheesy Italian music emanating from a restaurant. If a fight broke out in the vicinity we would enter a threatened state which would trigger an appropriate one-shot sound effect of screams and maybe instruments falling, dishes breaking, etc. and the music would cease. During high-tension moments (using the same tension meter as our interactive music system) the stores would be silent. Once tension went back down to low, we would slowly ramp up the idle state again until another fight broke out. Perfect plan! Unfortunately the studio ended up shifting gears and we moved from superhero games to music games. The storefront music would lay dormant again…

    Fast forward to early 2012. I had just joined Sucker Punch and we were in pre-production on inFamous Second Son. Being back in an open world title, I pretty quickly started to think about my beloved storefront music concept again. Everyone I pitched it to from our creative director to our music team down at Sony HQ loved the concept. So now it was time to design it. The first step was just to get looping sounds emitting from a point in space and figuring out proper attenuation and processing for them. Next it was time to get into the real nitty gritty. I had several challenges to tackle:

    A world inside a world

    inFamous Second Son takes place in present-day/slightly-future Seattle. It’s not real Seattle, it’s our take on the city, but we still wanted it to be a unique, diverse, funky place, just like real Seattle. We did not want it to be full of grunge music (and that is a story for another day!). I began talking with the environment team to get a sense of the variety of storefronts we would have, and some of what they created helped influence my ideas. Early on, we got an Irish Pub in the game. At which point I thought, man that’d be cool to have it play Irish music during the day and then become a punk club at night. Just like in real life! Then I started to take it further: what if we had traditional Irish music in the earlier times of day, changing to more upbeat, raucous Irish music in the evening and THEN a punk club at night. I was on to something. As we fleshed out the stores my list of music grew and grew. I wanted jazz and Chinese and J-Pop, club, top 40, and why not mariachi music in the Mexican restaurant and thai music, new age music for the yoga studio, and hell even Russian music to put into apartments where the Akulan gangs live? Sure they’re musical stereotypes, but they’re serving the purpose of a low ambient bed, they were never meant to be featured sounds. The result will be filling the city with greater perceived life. I also wanted to reach out to some local bands and get them featured in the game as well. I wanted a lot. So how the hell were we gonna get all this music?

    APM to the rescue!

    As anyone who’s worked with Sony can attest to, they have some of the most amazingly talented, brilliant people working in their music department. We were very fortunate to have a few of them working closely with us throughout the project. Beyond the game score, we started discussing this source music idea and they carved out some of their budget for a blanket license from APM for stock music. Matt Levine worked directly with APM who would put together playlists for various genres of music we were interested in. He would then send me the lists, which I would review, make notes and approve or ask for more. In the end, we had over 100 tracks in the game spread out over 8 times of day. On the local band side, having been in a band and played with some acts up here I reached out to some friends’ bands and also KEXP, the local college station, and got a list of some potential candidates, several of which made it into the final game. We also started talking to Sir Mix-A-Lot and he really wanted to get some tracks in, too. Now that we had music, we just had to get it playing in game.

    Rock Against the Man

    As I mentioned, I had earlier rigged up a test playing source music in a test world pretty quickly to help figure out volume, attenuation, and processing. From there, it was on to the challenging part: figuring out how to make it gel in-game. In inFamous Second Son, you play as Delsin Rowe, a rebelistic youth with super powers battling against an evil authoritarian police force, the D.U.P. (Department of Unified Protection, think of the TSA with guns, armor and superpowers). Delsin can clear the DUP out of each district of Seattle as part of the systemic, non-mission open world gameplay. The main theme here is freedom vs. security. The DUP keeps people secure, but Delsin gives them the freedom to do as they wish. To help reinforce this thematically we decided that when the DUP controls a district we’d only hear DUP music. We started with stoic, patriotic sounding cues, but steered the direction more towards syrupy, happy music that provides a wonderfully stark juxtaposition to the menace of the DUP. Once Delsin begins to drive the DUP out of a district, we stop the DUP music from playing in that area and instead let the storefronts come to life with their own individuality. We had a programmer working on the district status rigging, so I asked him to give me a callback signal for when the district status changed. I was then able to use this to determine what district the player was in and whether DUP music should be playing there (it emits from DUP speakers and closed off DUP storefronts), or whether the other storefronts should be allowed to rock in the slowly-becoming-free world. I didn’t feel my initial idea from way back about multiple states work work in this instance. The music acted more as personality for the district than simulating people inside, so I didn’t pursue any kind of multi-state reactive environment. Maybe next time!

    At the same time, I wanted some semblance of reactivity and also wanted to ensure the source music didn’t clash with the game score. So I tied the volume of the source music to our tension rtpc (Real-time Parameter Control in Wwise) which is also used for controlling the music intensity. When the player got caught up in combat, the music would fade out, when the combat abated, the source music would slowly ramp back up in volume. As if the owners of the shops were peeking through their windows, and once they saw the DUP dispatched, they cranked up the tunes again. So everything was working great, but now I had dozens and dozens of songs across ten or so genres, how was I going to make it all fit in a shippable state?

    Making it fit

    Beyond the goal and using source music to bring more life to our fictitious Seattle, I also wanted breadth and variation within the music so you wouldn’t hear the same cue EVERY time you passed a storefront. With a blanket license from APM plus around 20 local musician tracks the content was near limitless. Our soundbank budget, unfortunately, was not. However, every time we change the time of day in the game, we do a load to bring in our new skybox and other time-specific content. In fact, I was already loading all of my ambient sounds with these time of day loads. I devised a scheme to load certain music which could play at any time of day in our core ambient bank, which is always loaded. This ended up being the DUP music and our local acts. For the rest of the store fronts, I would load in 3-5 cues per TOD per genre. This way we have some variation during each time of day, as well as completely new tracks for most storefronts for each time of day change. For the local music, we had all 20 tracks in a random playlist emanating from Sonic Boom Records (a real Seattle record store), Sir Mix-A-Lot played from some of our neon-drainable low-rider hatchbacks (we HAD to have My Hooptie for that!), and the aforementioned Irish punk club featured 3 bands each rotating through a set of 5 songs each. You could theoretically stand by the Irish pub at night and enjoy a whole night of music (if it wasn’t so much fun to run around and use your powers instead!)

    My budget for the TOD banks was 7mb, of which I used 2-3mb for source music at VERY low bitrates. We processed them heavily with severe low pass filters and reverb, so we really didn’t need a lot of high end, and the lower encoded bitrates (24kbps OGG) aided in making the tracks sound like they were coming out of crappy speakers inside the storefronts. Most of the cues were edited to around 60-90 seconds since most people wouldn’t really be standing around listening to the music, and we wanted more quantity of tracks than longer songs for this reason.

    Here’s a video showing off just a few of the myriad storefronts we added music to. If you have a copy of Second Son, I highly suggest pushing the DUP out of some districts and running around to see how the source music aids in filling in the world without stepping on the score or any critical gameplay. It’s a subtle effect no one would likely notice, but subtlety is often the key to effective sound design.