Author: Rev. Dr. Brad

  • Adventures in Foley: The Tumbling Machine

    A few months ago we were recording some sounds for inFamous Second Son, when I realized how challenging it is to get continuous debris recordings in a tiny recording booth. Inspired in part by the ArenaNet team’s field recording journal from Guild Wars 2, I started to think about a way to be able to record long continuous debris recordings and, lo, the Tumbling Machine was born. I call it the Tumbling Machine because that sounds impressive, but really it’s ridiculously simple, yet pretty damn effective.

    I started with a giant plastic garbage can. The issue there is that the molded handles on each side prevent an even roll, so I cut them off with a dremel tool. Now it rolled nice and smooth but the plastic surface would obviously color the sound of the debris. To counteract the resonance of the plastic, I bought a package of eggcrate foam that you put on top of a mattress and lined the bottom and sides of the trash can with it. I tried a few different methods to affix it, but found the most effective was gaffer tape (duct tape would work fine too). The foam did a great job of insulating the impacts so you get the debris, with very little coloration from the plastic. The drawback, is that the foam can trap smaller particles of concrete, wood, glass or other debris you may want to record, but worse off, you could always replace the insulation each time you record a different surface. Here’s a short movie detailing the construction and use of the Tumbling Machine. In this instance, we were using it to record concrete rubble sounds.

    It’s a cheap, effective way to make clean, continuous debris movement sounds. Here’s a capture from the concrete recording session cleaned up, so you can hear the results:

    The one issue we’ve had is that the debris spills out as you roll the trash can. I’m planning on cutting a fairly wide hole in the lid of the can (so a blimp can fit inside without hitting the edges during tumbling), and cover the inside of the lid with foam to prevent coloration and try to keep the debris inside. Hope this inspires someone to make their own Tumbling Machine or maybe even something more outlandish/useful. Happy Tumbling!

  • Expectations of Perception

    Recently I was working on a project in which a country road had a small drainage ditch to the side of it with flowing water in it. I looked at it once, and instantly thought, “I need to add a sound for that!”

    Two weeks later, I was taking a hike through Cougar Mountain Regional Park (didn’t see any cougars– feline or otherwise), when I came across a very similar scenario in real life: a small stream of water flowing downhill. I stopped, looked, and listened, but to my surprise I heard no water trickling or babbling sounds emanating from this little stream.

    If I went back and removed the sound from my project, someone could walk through the world, see that ditch, and wonder, “why the hell isn’t there a water flowing sound coming from that water?” The simple point here is that our perception of sound often differs from the reality of sound, and in games (or any form of media for that matter) we need to carefully weigh this when crafting an aural landscape. If a user is expecting a sound and it’s not there, it makes a negative impression. Not necessarily because the overall sound design is bad, but rather s/he notices a sound is missing. We have broken the wall of immersion. In the real world, slow moving water needs speed, but it also needs an obstruction in its path to cause enough movement to generate an audible sound. In the game world; however, it may just need to exist with the illusion of movement: perhaps it’s just an animated texture, or a shader trick. There doesn’t need to be a rock or an eddy causing a rapid, it’s just there, it’s expected, so let it have sound. Unless of course that goes against the aesthetic you’re trying to develop in the course of your project.

    Sound design is all about managing perceptual expectation. We all know how weak gunfire sounds in real life compared to that which we create for games and film. So there is both the need to manage perception in the design of individual sounds as well as on the implementation side of sound design. But how do we choose what aspects in the world should and should not have sound and how those sounds behave? There are two things to consider here: technical and aesthetic.

    On the technical side there are decisions to make based on what is available to you. What device(s) are you developing for? How much memory do you have available? Do you have DSP? Is there any sort of scripting or complex behavioral structure at your disposal? How many concurrent sounds can we play? What else may be concurrently going on in the world? Fortunately, as technology evolves, tools and technical specs are both improving so that even mobile games can use Wwise, FMOD, Unreal, etc. to provide the designer with more options, power, creativity, and flexibility to achieve their sonic goals for a project. Handhelds and mobile are losing their “stripped down,” “less powerful” monikers so that the only limitations we may have on our sound design are those we choose to put there. Of course, we’re not to the Mecca of no technical restrictions yet. Even on Playstation 4, I don’t have limitless memory and resources and that’s probably a good thing. Limitations often drive creativity and allow you to see things in a different light. We still need to fit our design into the technology we’re using, it’s just a matter of understanding the limitations of that tech and working through them.

    The aesthetic side is more of a gray area. Technical specs are often set in stone, and while you may be able to negotiate for extra resources, you’re still working in an established ballfield. When determining what should have sound and how it should sound, that’s where the creative and artistic part of sound design really kicks in. This is where you get to decide (either by yourself is sometimes with the assistance of a game/creative director or other audio personnel) where you want the audio to take the user and how it should make them feel. There’s no real science in determining what is right or wrong, it’s usually a mix of gut feeling, experience, and inspiration from others that can drive you to the right place creatively.

    I do not mean to suggest that technical and aesthetic design decisions are mutually exclusive. On the contrary, in a well designed audio plan, they are intimately entwined, each one informing the other. We generally want to create a believable soundscape within the context of the game world. What that means specifically is part of the beauty and mystery that is our craft. And the key to meaningful sound design is often understanding the differences in perception and reality and ensuring your audio vision for a project matches the sonic landscape you wish to create.

  • Wwise HDR best practices

    Audiokinetic has released Wwise 2013.1 with many new features, among them PS4 support, ITU BS 1770 compliant loudness meters and HDR audio. We worked with Audiokinetic to develop the HDR feature set over the past year and now that it’s out, I’d like to share some of my best practices that I’ve come up with (so far) in using it:

    1). Keep it mellow: The first thing to be aware of is that the Wwise implementation of HDR audio is a relative volume scheme. We initially played with using SPL, similar to DICE’s Frostbite Engine, but abandoned that because a). we learned that even DICE didn’t use real-world SPL values, which sort of negates the whole reasoning behind using real-world values to set volume and b). because not everyone would use HDR and introducing a second volume slider (Volume and SPL) in Wwise just confused and overcomplicated things. So anything you want to be affected by the HDR effect (which may generally include all game sounds except UI, mission critical VO and the like) will live in its own bus with a special HDR effect on it. But this bus should be kept at a reasonable level. Generally around -12 to -18 dB. This will give you headroom in the final mix, and give your loudest sounds the ability to play without clipping. Furthermore when you have lots of very loud sounds plays, a more conservative bus level will allow things to sound cleaner. For individual sound structures, you can start with 0dB as your baseline, bring down sounds that should be quieter in the mix and bump up the louder ones above 0dB so they’ll push the HDR window up when they play.

    2). The voice monitor is your best friend – The new voice monitor (shortcut: Ctrl + Shift + H) is a fantastic asset for tuning individual sound levels within the HDR space. Being able to visualize the input and output of all sounds, as well as see what affects the HDR window and how is immeasurably important when it comes to tuning individual sounds within the HDR space or preventing pumping of quiet sounds when a loud sound plays. The voice monitor is a fantastic tool whether or not you’re using HDR, but the ability to see the window behavior really makes it very intuitive as to how the effect works.

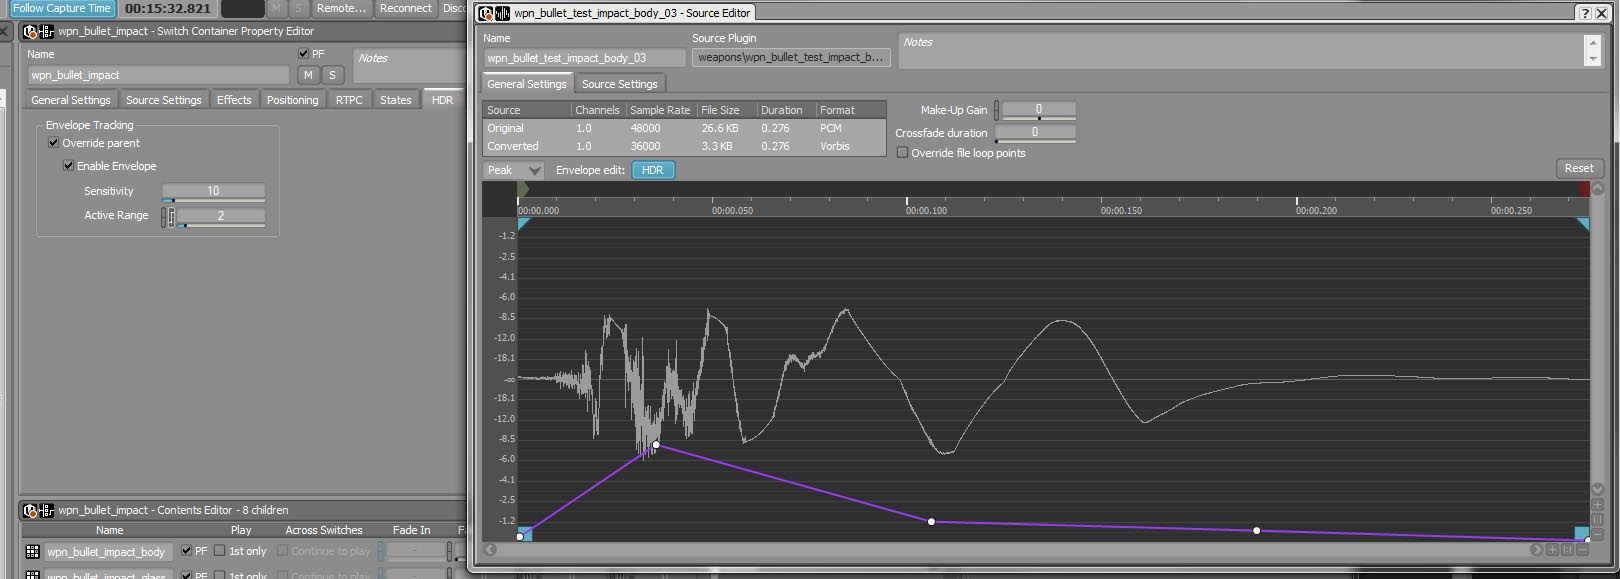
    3). It’s okay to cheat: Don’t be afraid of a little judicious use of make-up gain to make an important sound punch through without affecting the HDR mix. Make up gain is applied post-HDR effect, so it won’t affect the window movement, but will boost a sound’s level. More importantly, play with the sensitivity slider in the HDR tab to dial in the best curve for your sounds. The HDR window can follow the volume of a sound, but often you only want the initial transient to affect the window and the tail to decay naturally while letting quieter sounds come through. For even more granular control, you can edit the envelope of individual waveforms in the source editor window. As an additional control, you can also reduce the tail threshold for louder sounds. Most of my louder sounds are set to 3 or 6, which means after the first 3 or 6 dB of loudness, the sound is removed from the calculation of the HDR window.WwiseEnvelopeEditing

    4). Only generate envelopes on the important sounds in the game. This is a simple optimization tip. It takes CPU to constantly analyze the envelope of every sound. I only generate envelopes for the louder sounds in my game (making sure they’re not generated on ambience and incidental effects). It won’t affect the mix, but provides some performance savings.

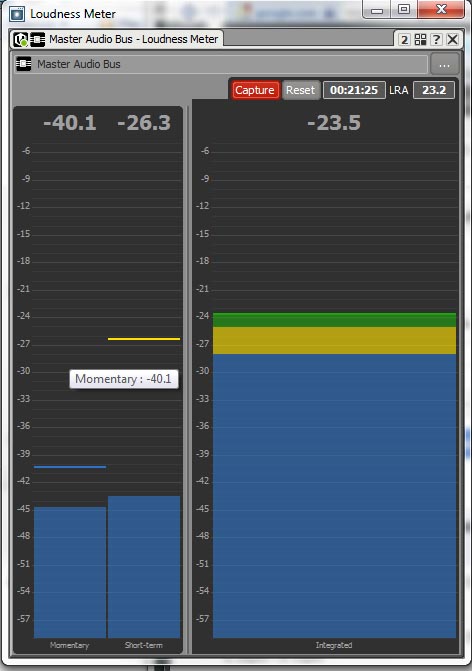
    5). The EBU/ITU-R BS.1770 standard is gold. Keep you game averaging around -23 LUFS/LKFS (based on a minimum of 30 minutes of gameplay). Everytime you play your game, connect Wwise and keep an eye on the Integrated meter in the Loudness Meter. What matters here is the AVERAGE loudness, the longer you capture, the more accurate your measurement. As a rule of thumb, I always keep the loudness meter up and running in my project.

    HDR_LoudnessMeter

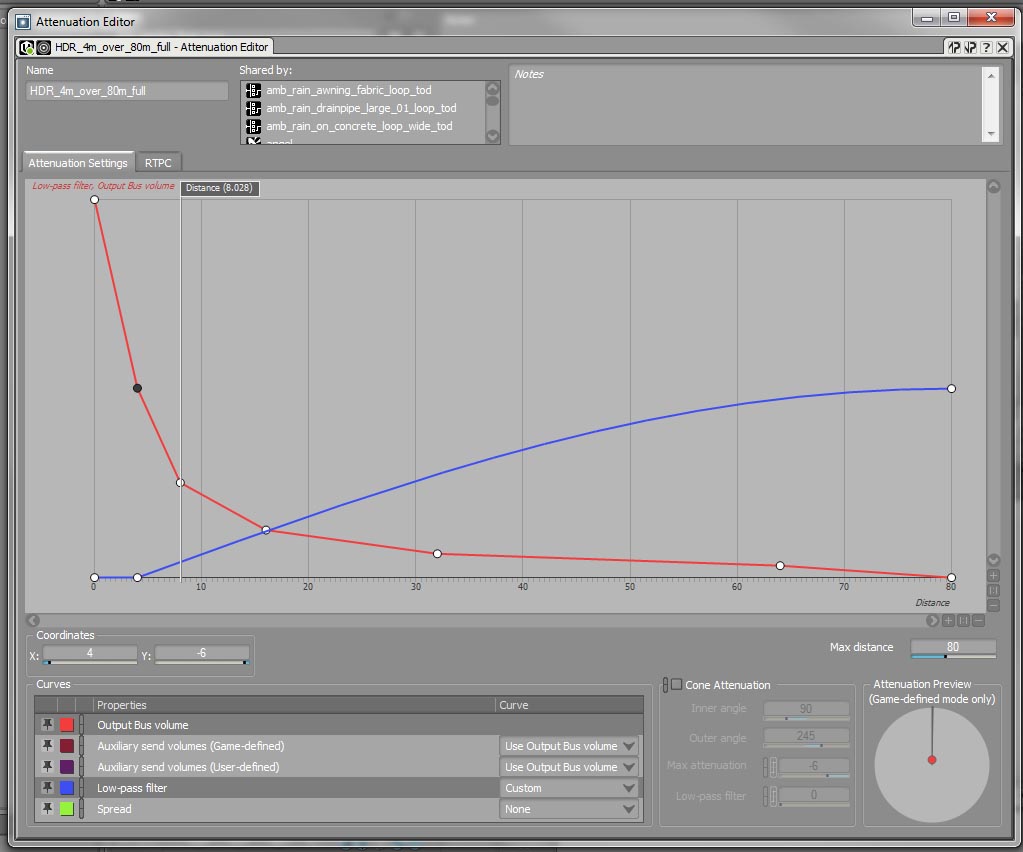
    6). Inverse square attenuation make sounds behave naturally – one of the initial “issues” I had once we got HDR working in our game was that using our old attenuation curves (generally an exponential curve over a set distance based on the general loudness of the sound ranging from 15m – 250m) just didn’t work as we needed them to. We wanted attenuation curves to sound natural in a real-world environment, so I created a set of inverse-square curves. The inverse square law states that the volume of a sound is halved by a multiple of every x meters. For example the most common curve we use falls off fifty percent every 4 meters over the span of 80 meters. So at 0m it’s 0 dB, at 4m it’s -6dB, at 8m it’s -12dB, at 16m it’s -18dB, at 32m it’s -24dB, etc. This has the added benefit of limiting the number of attenuation curves needed which is a performance savings. Of course, inverse square curves are not a blanket solution, there will always be times when you want/need something custom, so we still maintain some custom curves.

    inverse_square_curve

    I’m happy to share the settings I have on my HDR effect, but I feel this will vary based on project, so I’m not sure how useful that would really be for people. Another feature we’ve added is a speaker_type switch controlled by an rtpc which affects the HDR threshold based on the speaker type the user is playing through. The end result is automatic dynamics switching based on speaker type where the better your speaker system, the greater the dynamic range in the mix (similar to what games like Uncharted offer in their audio options menu). In short, there’s a ton of ways to use this great feature, and I’m sure there’s going to be plenty of other tips and tricks people figure out as they start to play around. Enjoy!

  • A sound designer is born: my origin story, or how to get lucky and lie your way to success

    During GDC this year and the week after I ended up telling the story of how I got into the industry a few times, so I decided to commit it to the ether for posterity or some false sense of self-worth. I’ve also decided to embarrass myself publicly by digitizing the demo I made way back then in 1998 that got me into game audio.  It is horrible and borders on unlistenable. Well technically you can listen to it, but you wouldn’t want to, and it’s hard to fathom how someone could have heard this monstrosity and then offered me a job.

    My story, while it may not have been exactly common 15+ years ago, doesn’t really happen anymore. The short story is that I lied my way into game audio. The longer story is that I was temping at Berkeley Systems, a video game company in Berkeley, CA after graduating college and they liked me enough to keep me on as their shipping guy. I liked it there, but really wanted to be doing something creative, so I started making a lot of noise as such. I was passed up for a production assistant job (thankfully) and ended up talking to their sound designer a couple times because I thought he had such a cool, crazy job. At this point in my life I’d never used a computer program related to sound ever. I knew how to play notes in BASIC and had a cassette 4-track and had done tons of music, tape loops, and other weird experimental stuff ever since I was a kid, but I didn’t know what MIDI was, how to create a sound effect or really much of anything in regards to sound and computers.

    Anyway, one day the VP of Product Development called me into his office to tell me they fired their sound designer (apparently he didn’t come into work very often and they’d had to contract out all their sound work as a result). So he wondered what experience I had and if I’d be interested in the job. I couldn’t believe this was happening, so seeing an amazing opportunity, I lied through my teeth, telling him I had tons of experience and had scored some student films, blah blah blah. He asked me to bring in a demo the next day. I ran home that night and banged a couple things out on my sampler (half of which were a couple synthy pad soundscapes I claimed were from a student film I worked on. They weren’t.) and threw another horrible track called “Gall Stone Attack” onto a cassette and gave it to him. The next week he called me into his office and said “It’s nothing you’re ever gonna hear in any of our games, but it shows you know what you’re doing, so you got the job.” I was ecstatic. And because they’d already farmed out their sound work for the next 6 months or more, I locked myself in my office and started teaching myself everything I could about digital audio and sound design. I believe my first experiment in editing digital audio was removing all the guitar solos from Slayer’s Seasons in the Abyss, but that’s a story for another day. Nowadays, kids are coming out of school with degrees in sound design and blowing me away with their skillsets, so this whole thing known as my career could never happen today.

    Everything on my demo was recorded with a Roland S-50 12-bit (!) sampler. It had a floppy drive and I had tons of sample disks for everything from pads to horns and strings to sfx. “Gall Stone Attack” also had a Roland R-8mkII drum machine and Casio SK-5 on it (and I think I used the SK-5 on “Silly Torture” as well). Since I had no sequencer or even an audio editor or audio interface for my computer, each track was recorded live onto my Fostex 4-track and mixed down to the cassette below. (I opted to not de-noise these as part of the digitization process, so they could “preserved” in the state in which they were originally heard).

    And so without further ado, I present a public shaming: two tracks from my demo reel in early 1998. I cringe when I listen, and laugh a little. My skills have definitely come a long way, but I still can’t believe they listened to this crap and took a gamble on me anyway. I’m eternally grateful and shocked. Be forewarned.  Be gentle.

    [soundcloud params="show_comments=false" ]http://soundcloud.com/revdrbradleydmeyer/02_SillyTorture-mp3[/soundcloud]

    [soundcloud params="show_comments=false" ]http://soundcloud.com/revdrbradleydmeyer/03_GallStoneAttack-mp3[/soundcloud]


  • Modulation in Wwise

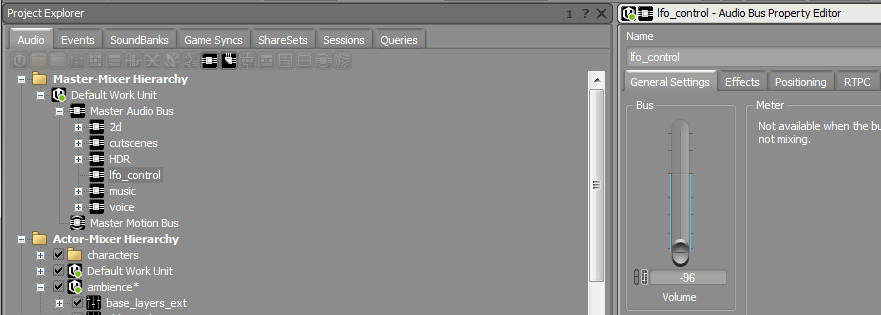
    One of Wwise’s few shortcomings is its current lack of support for LFOs. Modulation can be a godsend to make looping static sounds feel way more dynamic and alive. (an example using volume, pitch, and lpf is here). I wanted to outline two different means here you can “cheat” modulation in Wwise using some technical trickery.

    1). Modulation RTPC:
    This is the simpler method, although somewhat limited in it’s dynamism. Simply create an RTPC linked to a global timer, and once the timer reaches it’s max, it resets itself to 0. I’ve called mine “modulation” with a min of 0 and a max of 100 (units being set in the engine as seconds). I can then draw an rtpc curve for modulation on any sound I want and affect the pitch, volume, lpf, etc. over time (friendly reminder: subtle pitch changes are WAY more appealing than extreme pitch changes).The most important factor here is to remember to have your values at 0 and 100 be identical, so there’s no pop in the loop. The obvious drawback to this solution is that the modulation is uniform with no possibility of change per cycle. However with a 100 second loop, you have a fair bit of time to build a dynamic modulation curve whose looping won’t be easily detected by a user.

    2). Using a tremolo effect as an LFO:
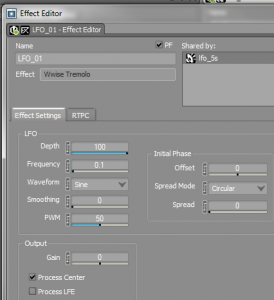
    This solution comes from Steven Grimley-Taylor who posted about it on the Wwise forums, and is nothing short of a brilliant use of the tools available in Wwise to make an LFO a reality. It also has some limitations, which we’ll discuss in a bit. The basic gist of this concept is to create a white or pink noise sound generator and sidechain it to a tremolo effect. As Steven explains it:

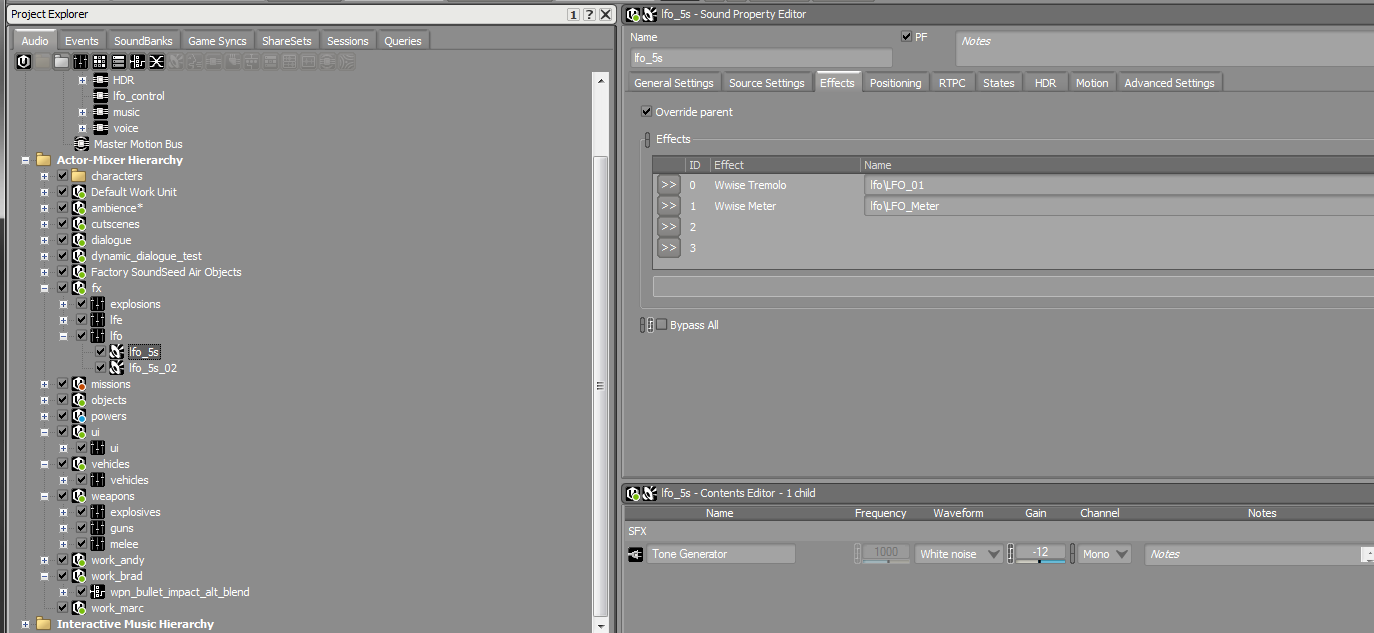
    “Create a Sound SFX object with a Tone Generator Source set to White Noise. Then add a tremolo plugin and then a metering plugin which generates an RTPC

    Wwise_Mod_LFO_fx_layout

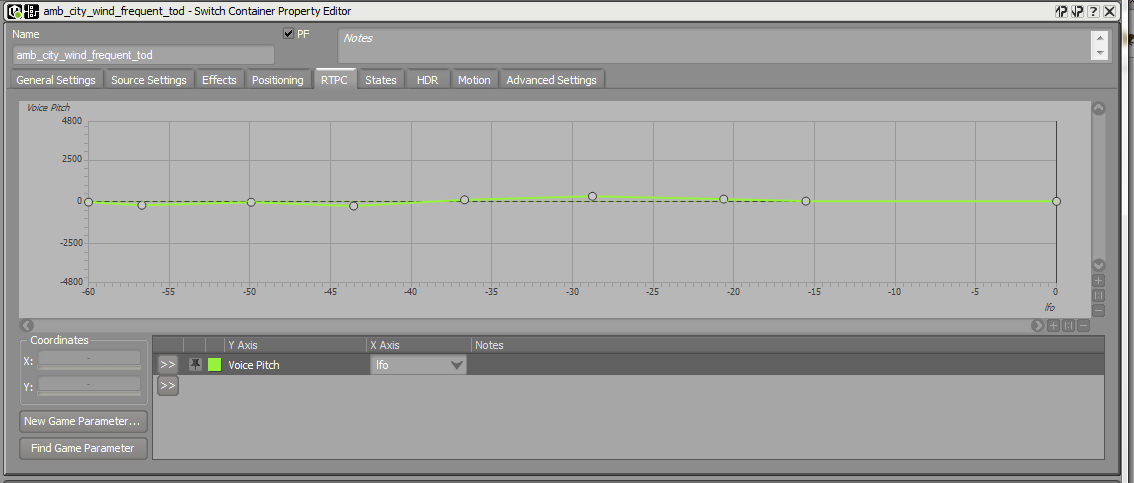
    The tremolo becomes your LFO control and you can map it anywhere you want. It becomes unstable at faster speeds, but then this is probably not the best solution for Audiorate FM. For normal ‘modulation’ speed LFOs it works a treat. Wwise_Mod_LFO_tremoloWwise_Mod_LFO_rtpc


    You can also go into modular synth territory by creating another of these LFO’s and then modulating the frequency of the first LFO with the amplitude of the second.

    Oh the LFO audio should be routed to a muted bus, you don’t actually want to hear them, just generate a control RTPC”Wwise_Mod_LFO_bus

    I’m currently using a couple of these in my project and it works great, the only drawback is that using the tone generator plus the tremolo per LFO isn’t super cheap (~2 – 3% of CPU), and the more modulators you want to add, the more expensive it gets. But you can drive the parameters of the LFO from other rtpcs, opening up enormous avenues of creativity and evolving sounds.  It’s a really nice way to spice up some bland looping sounds and give them a bit more life.

  • The future of next-gen sound blah blah blah

    Sorry, I couldn’t resist being a little snarky as I typed that title out. Every time there’s a new generation of consoles on the horizon, words begin to flow about what “next-gen” means in relation to (insert your discipline here).  For me, there are two interrelated aspects that we can look at to push envelopes further: technological and structural. Technological advances are those made possible by the capabilities of the hardware and how that interacts with software. CD-ROMS meant we could start streaming redbook audio, tons of voiceover, and video. The Xbox’s DSP chip gave us a low pass filter and reverbs built into the system. The PS3’s SPU core architecture gave us an entire core (or more I suppose if you sufficiently bribed your programmers) to do with whatever we wanted: create custom DSP or utilize FMOD or Wwise and go crazy with the delays and reverbs and eqs, etc. The PS4’s 8gb of memory means, given the time to load data into RAM, we have a near limitless reservoir for game resources. Ok, so “near limitless” is probably an over-exaggeration, but we’re talking a 16x increase over the last generation!

    By structural, I mean how does the technology create new ways for us to deliver a sonic experience. The sub-industry of mobile and web development have democratized game development significantly, and with them and the rise of Unity as a viable engine has audio middleware solutions like FMOD and Wwise along for the ride as well. Even Wwise, which started out as a PC, 360, PS3 only platform 6 years ago, now has support for iOS, Android, Windows Phone, and direct integration into Unity. With the democratization of tools comes the possibility to use these tools in novel ways. One such example is adaptive mixing. While in console land we’ve been doing this for years (for a great example of this see Rod Bridgett’s discussions of mixing Scarface: The World is Yours for PS2 back in 2006), this is only now being possible across all platforms. And with the potential for the Ouya, Green Throttle, Steam Box, Apple TV and other small Android, iOS and PC-based home consoles in the coming years we should see “next-gen” meaning what can we do to push content to be more impactful no matter the platform.

    While I think the structural aspect has far more implications for sound design as a whole, much of what becomes possible is through technology. I want to touch on one specific technology in this post: procedural synthesis and design. Procedural synthesis is nothing new. Guys like Nicolas Fournel and Dylan Menzies have been doing it for years. Audiokinetic have had wind and impact generation tools in Wwise for several years now. Audiogaming’s wind and rain tools are integrated into the new version of FMOD Studio and will be making their way into Wwise soon (not to mention their latest plug-ins for procedural generation of footsteps, vehicle engine models, and fire).  And there have been countless papers and demonstration videos showing off better and better sounding procedural algorithms from the aforementioned to elements like fabric and full physics simulations.

    When developing a game, we often take a cross-platform approach because it’s the easiest way to maximize profits for minimal cost: put your product out on every possible platform and you have a multiplier effect on how many people may play/buy your game, ideally with minimal additional effort on your part. Hopefully in the next year, if all these new hardware devices do come out, we’ll be at a point where we have enough processor to utilize procedural synthesis in games across all platforms, and not just minimal use on 360, PS3, and PC. Having these effects not just available, but possible, across all platforms maybe the shot in the arm procedural synthesis needs to finally bridge the gap from “talked about incessantly” to “the here and now.”

    These two elements: realtime, dynamic mixing and procedural synthesis, while nothing new, may be the holy grail of audio development for games in the near-future. I am eagerly looking forward to how things shape up over the next few years, to see what others are doing, and to further explore these waters myself.


  • …introducing what I’ve been doing for the past year!

    As most people know, Sony introduced the Playstation 4 last week which means the veils of silence and secrecy have been lifted and I can FINALLY divulge the project and platform I’m working on. I’m really excited about the project and am quite happy with how it’s been shaping up. Below is our debut trailer, which I worked with our team down in Foster City to do the sound design and mix. I hope to share some interesting tidbits about the audio systems I’ve designed for inFamous: Second Son over the coming months, so check back here occasionally or follow me on twitter or shoot me an email, give me a call, send me a pigeon, etc.  But for now, here’s the worlds first peek at inFamous: Second Son captured in-engine (and using lots of in-game sounds although we did the sound pass in post just because it was a lot easier to do so).

    [ylwm_vimeo]60270081[/ylwm_vimeo]

  • An homage to the best boss I’ve ever had

    Let’s face it, if you’ve been in the industry for a while, you’ll know how tumultuous it can be. Studio upheavals, shutdowns, re-organizations, corrections of vision, layoffs…call them what you will, but chances are you’ve seen a few. It’s an unfortunate reality in this industry. In my now 15(!) years in game audio production, I’ve been through at least 10 rounds of layoffs, and two studio shutdowns. (The only studio I’ve worked for that’s still around today besides Sucker Punch is Free Range Games.  Keep it up guys! Otherwise people might think the problem is me!)

    The hardest thing for me when I see news stories about studio layoffs and shutdowns is thinking of the talented people affected. Most folks probably land on their feet at another studio, but often at the cost of uprooting their families and lives across the country. And sometimes, the new jobs just don’t show up. I’ve seen a lot of exceedingly talented people get booted from the industry as a result of no jobs for them.

    I guess this is a story about one such man, who did so much for me and my career and was also the greatest boss I’ve ever had. (And I’ve had a couple good ones since, but Jun Funahashi takes the cake). Jun was a Konami man. He started there in Japan back in the late 80s and worked as a composer and sound designer on such classic NES games as TMNT and Castlevania III. (In fact when we’d interview people at the studio and they found out some of his credits, they would often start fawning over Jun, not in an effort to get hired, but because they were fanboy struck). Back then Konami had their own band, The Konami All Stars, or Kukeiha Club, who would travel around and play Konami music at various events, and Jun was their keyboardist.  As time went on, he climbed the ranks and eventually moved to Konami’s studio in Chicago. He loved it and worked there for several years until they asked him to move out to Redwood City in California and join the team as Audio Lead. In the late 90s, Konami decided to open a new studio in Honolulu, Hawaii, and picked Jun to become the Audio Manager and build up their audio team from scratch. When I got there in 2001, they had been open for less than two  years and had worked on a few aborted projects, as well as a Major League Soccer game. They had one other sound designer, Jaren Tolman, who had been at Single Trac (makers of Jet Moto), was immensely talented and friendly and would go on to be a great audio director in his own right (No stranger to layoffs himself, I believe he’s now doing freelance for games and film). In addition to the new soccer game, we were working on a Jurassic Park III title for Game Boy Advance and had two other GBA titles that would be coming into production over the next few months.

    I remember my interview with Jun in late 2000 or early 2001 at the studio. We were seated in the big conference room surrounded by windows overlooking Waikiki and the Pacific Ocean. It was unreal, the best way to sell a company for sure! About halfway through the interview Jun says to me, “You do realize this is a Japanese company, right?’ I tell him, ‘Yes, but what does that mean actually?” I was totally surprised and taken aback by his answer, “Um…it means we’re really disorganized.”

    That’s the first thing that struck me about Jun was his honesty. He spoke from the hip and didn’t try to keep us in the dark about what was going on, like some managers I’ve known or had. We were always kept abreast of what was going on in the studio, and Jun made sure we were well informed (at least as much as he knew). With that said, he also did his job phenomenally, which, in essence, was to take care of all the bureaucratic bullshit and let us do our jobs. Now that I’m a manager and have to spend so much of my time doing those tasks, I realize how important that was for our team (and how thankless it must have been for Jun, and things were WAY more bureaucratic and nutty at that studio than any other I’ve worked at).

    Another place Jun excelled at was understanding the value of a good team. Jun took his time assembling his team and while we missed out on some talented people who couldn’t get over the fact that we lived on an island just 45 miles across, there were other people we passed over because the fit wasn’t there with us culturally. This was the first time I’d ever seen personality become such an important factor in the hiring process, and the results were overwhelmingly apparent. While the studio as a whole may have been disorganized, the audio team was lean, efficient, and somehow able to handle 3-5 simultaneous projects with just 2-3 designers and a programmer. This was due to the people Jun hired, (and on a more macro scale to Jun’s intuitive good sense in hiring). We worked really well together and had a functional relationship whereby one of us would be the lead on each project and figure out the direction and audio needs and the others would pitch in as required with design. We worked a lot, but it was such a great team that it made the crunches quite a bit more bearable.

    Which leads me to another of Jun’s great legacies that I try to extend into my own career: he never overmanaged. As I said, Jun did a great job of taking the brunt of the bureaucracy out of our jobs so we could focus on being creative, but he also trusted us enough to let us each take responsibility for our projects. We checked in frequently, but it was very, very rare that Jun would question our direction, and if so it was often with good reason. And he always provided sound, concise feedback.

    Jun is also a man with golden ears. Not literally, or else Glen Beck may have sliced them off years ago. But we used Jun as the final arbiter for whether our mixes were good enough. Mixing at Konami was always a group experience, which was really a great culmination of all of our separate work coming together into the final product. We would all nestle into our tracking studio in the back of the office and play through the game taking notes of what needed to be quieter, louder, eq’d differently, etc. We would all provide feedback, but ultimately we always put it upon Jun to give the final yay or nay on the mix. His golden ears were invaluable during all the music games we worked on as well. (5 DDR titles while I was there and another 2 afterwards I believe). At one point early in my time at Konami when I was still a bit fresh faced in the industry (I’d been a sound designer for about 3 years at that point, but only for PC and online titles). We were working on a Game Boy Advance collection of classic Konami arcade games. I was the lead, and so it was my job to recreate all the music and sfx from these classic games. (No small feat considering they were all old chip sounds, made from square waves and noise generators, so I had to recreate everything from scratch). While I love writing and playing music, transcribing music is not a strength of mine. Jun realized this and helped me resequence the music for nearly every one of the six games in the collection. He taught me all those necessary tricks of the NES and pre-sampled audio days like using noise generators with different envelopes to make everything from snares and high hats to explosions. Jun thought nothing of coming in and saving the project effortlessly and selflessly, all the while maintaining his own duties at the same time.

    I could go on for days with Jun anecdotes: about how he quit a 40-cup-a-day coffee habit cold turkey or saved my ass from getting fired for trying to put together a collection to buy a team a copy of their newly released game (it was studio policy at the time that we didn’t get a free copy of our own games we just finished!), or how understanding he was when we began to plan my departure from the studio, but this isn’t a eulogy; the guys alive, kicking and doing great!  It’s more of a remembrance of his time in the industry.

    Unfortunately, Konami Hawaii studio was shut down in 2006. There were really no other studios going in Hawaii at the time other than Henk Rogers’ Blue Planet, (which was sold off to Jamdat, which in turn became EA, which in turn got shut down.  He and a bunch of former colleagues are still out there with Tetris Online). Jun definitely didn’t want to go back to Japan, and his job hunt wasn’t going so well. How many studios need Audio Managers at any given time, and once someone has that position, it’s pretty rare that they’re going to leave. So he decided to head back to where it all began: Chicago. Jun got some freelance work at Midway working on Stranglehold (the John Woo/Chow Yun Fat game), but after that there was nothing. No leads, no jobs, but a family to feed, rent to pay, etc. So Jun had to leave the industry (though he’s still available for freelance work if you’re interested!). He’s doing great with a sales job, traveling the country, and his kids are growing up. But I also know what Jun did for me as a person, for my career as an audio director, and besides being eternally indebted to him and his wisdom, spirit, humor, friendship, and mentorship, I am remiss at the other designers out there who have missed out on the amazing experience of working for Jun Funahashi.

    You can see a partial list of Jun’s credits here, but what you miss until you meet the man are the intangible qualities of a great human being.
     

  • Adventures in the Field, Volume 2: Snowboarding

    While we were working on the skateboarding game back at Free Range Games, we were hoping it would take off and they’d ask us to do a snowboarding game (it didn’t, but as a stopgap we ended up making SummitX Snowboarding on our own).  Since the project would have likely happened in the summertime, I opted to make a huge sacrifice for the team and spend a lot of time up in Lake Tahoe recording snowboarding sounds during the winter.  I needed to get a gamut of various terrain types from the corduroy and packed powder of ski run groomers to spring corn to the neck deep powder of the backcountry and even loathesome sheets of ice and rocks.

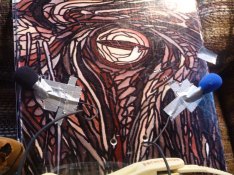
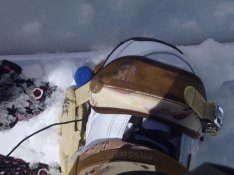
    Fortunately, I’m a much more competent snowboarder than I am a skateboarder, so I would be able to capture the sounds myself.  The challenge here was how to get quality sounds of the board carving through various snow types with minimal (and ideally no) wind. I decided to try two methods simultaneously and see what worked.  First off, I bought some little windscreens for my Core sound binaural mic.  I attached this to an Edirol R-09 stuffed into my pocket.  Over the course of several sessions, I experimented with several mic placements: taping them to the back of the board on either side (facing backwards to minimize wind), strapping them to the top of my boots, and taping them to the middle of the board on the left and right. I coupled this with a Zoom H2 with a windscreen stretched over the mics held in my hand as low to the ground as I could get it. Again, not the best quality recorders, but with a high impact sport like snowboarding I was only willing to risk my equipment so much!

    Between the two, over a course of many days, I was able to get some decent sounds across multiple types of terrains.  (The schedule was a scant 2 months, so we ended up forgoing terrain types.  I experimented with changing the terrain based on altitude from powder to packed powder to ice, but it didn’t work very well without a visual or physical change to the terrain). I found the best results actually came from the mics on the inner (wind-protected) side of the binding and holding a recorder low behind me with the mic facing up the mountain (and thus away from the wind direction).

    The bulk of what ended up in SummitX Snowboarding was from a bluebird day doing backcountry with my friends Sati and Melody Shah on Rose Knob Peak, near Mt. Rose in North Lake Tahoe.  It was perfect powdery spring conditions with very little wind.  We did see some bear tracks, but fortunately, no bears! To get the sound of your board riding over rock, rather than sacrifice my board, I ran the edges over a stone mortar and pestle and the results worked pretty well. The turns, carves, and powerslides were taken from some of my other recordings, and I made soundsets for more of the planned terrains, which have yet to see the light of day. For the snowboarder movement including clothing, boot squeaks and binding creaks, I recorded those in the comfort and relative quiet of my apartment, using Mackie Onyx pres and a Neumann TLM 193.

    Here’s a composite from the game:

    You can also buy it on Android or iOS

  • Psuedo-Occlusion in Unity

    Unity is an awesome engine for quickly iterating and building game content. The audio features have definitely improved over the years, but it’s still rather limited in many ways.  Randomization of pitch, volume, lpf, or even sounds can only be done with a little bit of scripting savvy.  Someday, either Unity will fix this or I’ll publish my scripts for these common practices on the asset store :-).   One of the features we added at Free Game Games which I’m most proud of was a psuedo-occlusion scheme utilizing trigger boxes and an enum (and enumerated static variable) to attenuate and apply a low pass filter on certain sounds. This feature was used prominently throughout Free Range Games’ canceled skateboarding game, as well as Freefall Tournament, which is playable on Kongregate.com.  It was one of the more advanced features we added to Unity on the audio side.  I relied heavily on the scripting wizardry of Jeff Wood, a fantastic designer whom I worked with both at Free Range Games and Shaba Games before that, to handle most of the technical scripting. Our solution was not necessarily the best method to occlude sounds, but it was functional, so I’d like to outline the system so that people can ideally glean some information from it and possibly improve upon it themselves.

    The core script components of our system were an AudioOcclusionTrigger and an AudioOcclusionObject.  All objects the we wanted to occlude would have an AudioOcclusionObject script attached to it.  To trigger the occlusion we created trigger boxes and attached an AudioOcclusionTrigger to that trigger box.  Since we may want an object to be occluded in multiple boxes, we created an enum containing a list of occlusion “categories.”  This list was rather arbitrary and dependent on the level design.  I believe we had things like “Hallway,” “ExtAmbience”,  and “IntAmbience” So for example in our skateboarding game, we had a warehouse level in which two cavernous rooms were connected by a small hallway. Each room had an ambient emitter which played a looping ambient drone and  occasional one shots and a PA loudspeaker which was pumping out our licensed music soundtrack. The hallway had a trigger box around it with an AudioOcclusionTrigger script labeled as “hallway.” The ambience and music emitters in each large room where tagged with the hallway enum with their respective AudioOcclusionObject scripts, and whenever the player entered that trigger, all the sounds which contained an AudioOcclusionObject script with the category set to “hallway” would  attenuate and get filtered over time.  And when the player exited that box, the reverse wold happen (the objects volume and lpf would be restored to where they were prior to occlusion).

    Here is a short video demonstrating the effect on the music and ambience:

    We did a lot of safety checks to make sure the sounds aren’t already occluded before attempting attenuation, creating filters if they don’t exist, etc. but it’s still a far from perfect solution.  It really only works well with fairly simple geometry and the more occlusion categories you add, the crazier it can get to keep track of your objects and make sure everything is set up properly.

    But there you go.  If you’d like to download the scripts and check it out yourself, they’re available here.